IPv6: Configuration Guides
Why use IPv6?
Much like your house needs a postal address to receive physical mail, all your devices need an IP address to be able to send and receive data on the Internet. Unfortunately though, the globe ran out of unallocated IP addresses back in 2011.
The life of IPv4 has been prolonged by a "stopgap" technology called CGNAT (Carrier Grade Network Access Translation), which allows for multiple services to share a single IP address. However, this has significant drawbacks:
Streaming services may temporarily forbid access and accuse you of using a "VPN" or "proxy" (Virtual Private Network)
You may be unable to access your security cameras or smart devices when you're away from home
You're unable to host content at home like web/game servers
Multiplayer video games may not work correctly, citing errors like "NAT Type 2", "Double NAT" or references to "UPnP"
Your Work from Home setup to access your workplace may simply not work
Enter IPv6: it allows for WAY more addresses, without any of the drawbacks. It's designed to work alongside IPv4, eventually allowing for IPv4 to fade into legacy support.
So what does that mean for you?
It's simple: enable IPv6 on your modem/router, and everything else will continue to work.
For more info, read our blog post on 'Why IPv6 Matters'.
How to configure IPv6
First, check to make sure whether your connection hardware has already configured IPv6, as it may be already enabled: http://test-ipv6.com/
Generally, you can enable it by doing the following steps:
Log into the web interface of your modem/router
This is often 192.168.1.1 or 192.168.0.1
Find the Internet or WAN settings page
Enable the checkbox for IPv6 and/or select the dropdown for Automatic or DHCPv6
Avoid dropdown options like SLAAC, Tunnel or Link-Local Only
Save/apply changes, and reboot
Tips for configuring IPv6:
Do not attempt to set IPv6 manually — the configuration process is automatic, and the complexity of configuring it manually will do you your head in!
Upgrade your firmware — if your modem/router offers a firmware update, be sure to apply it. They provide significant bug fixes that among other things, ensures IPv6 works seamlessly.
Reboot once you've set it — after you think you have got it working, reboot your modem/router, this will allow all your household devices to automatically see and use IPv6.
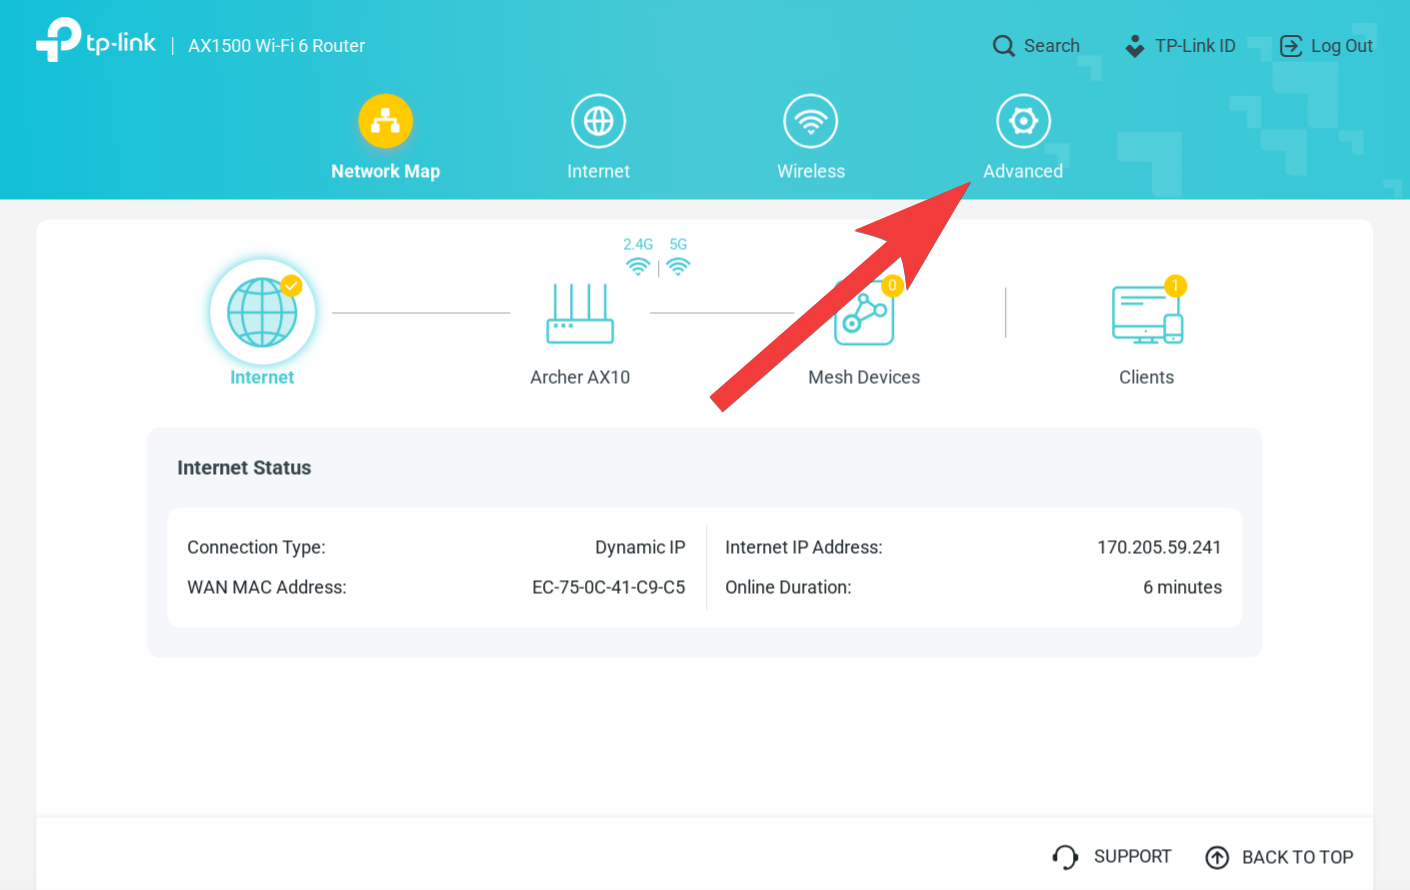
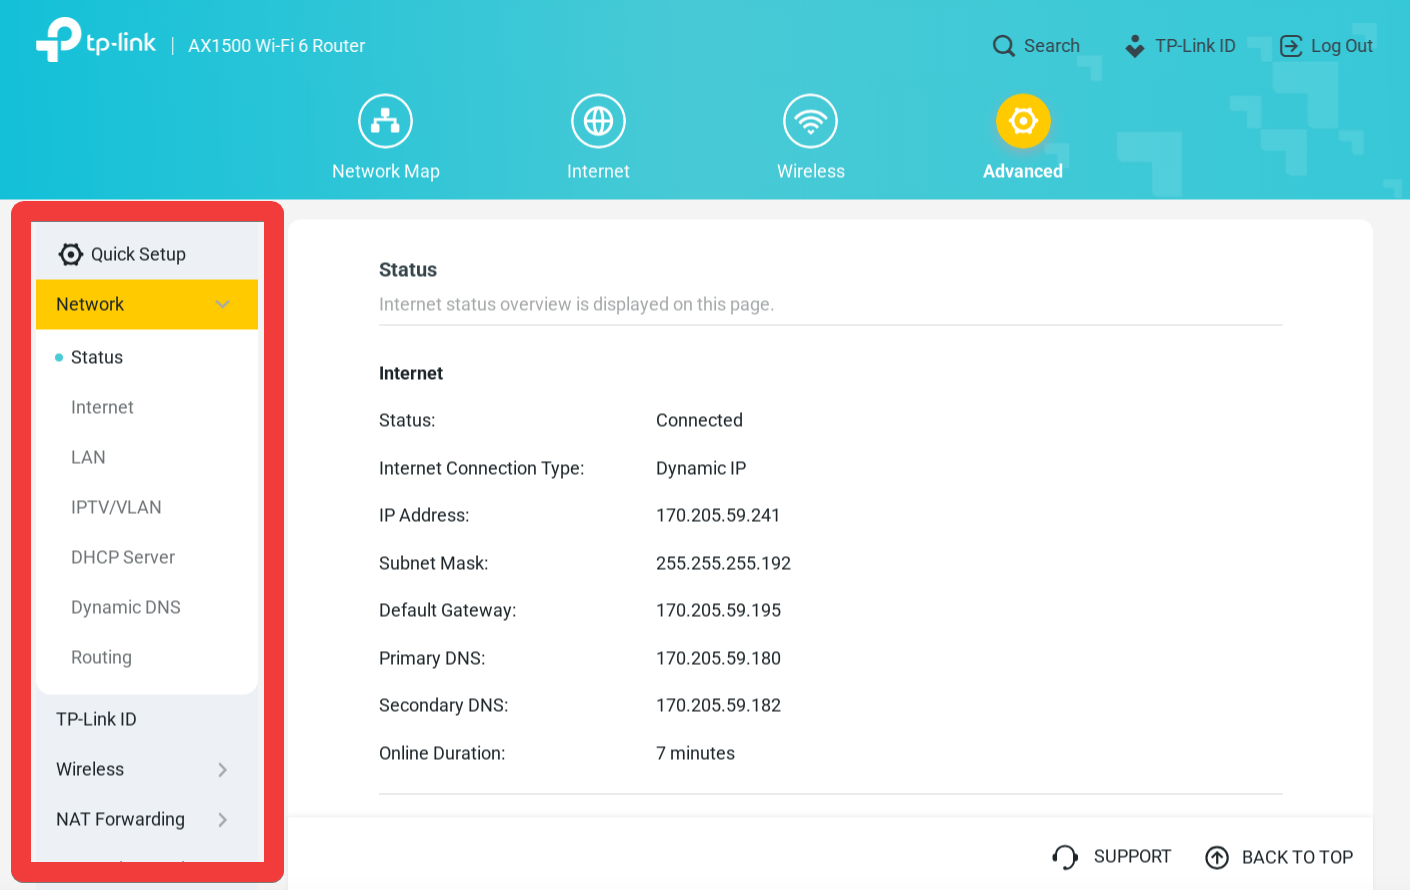
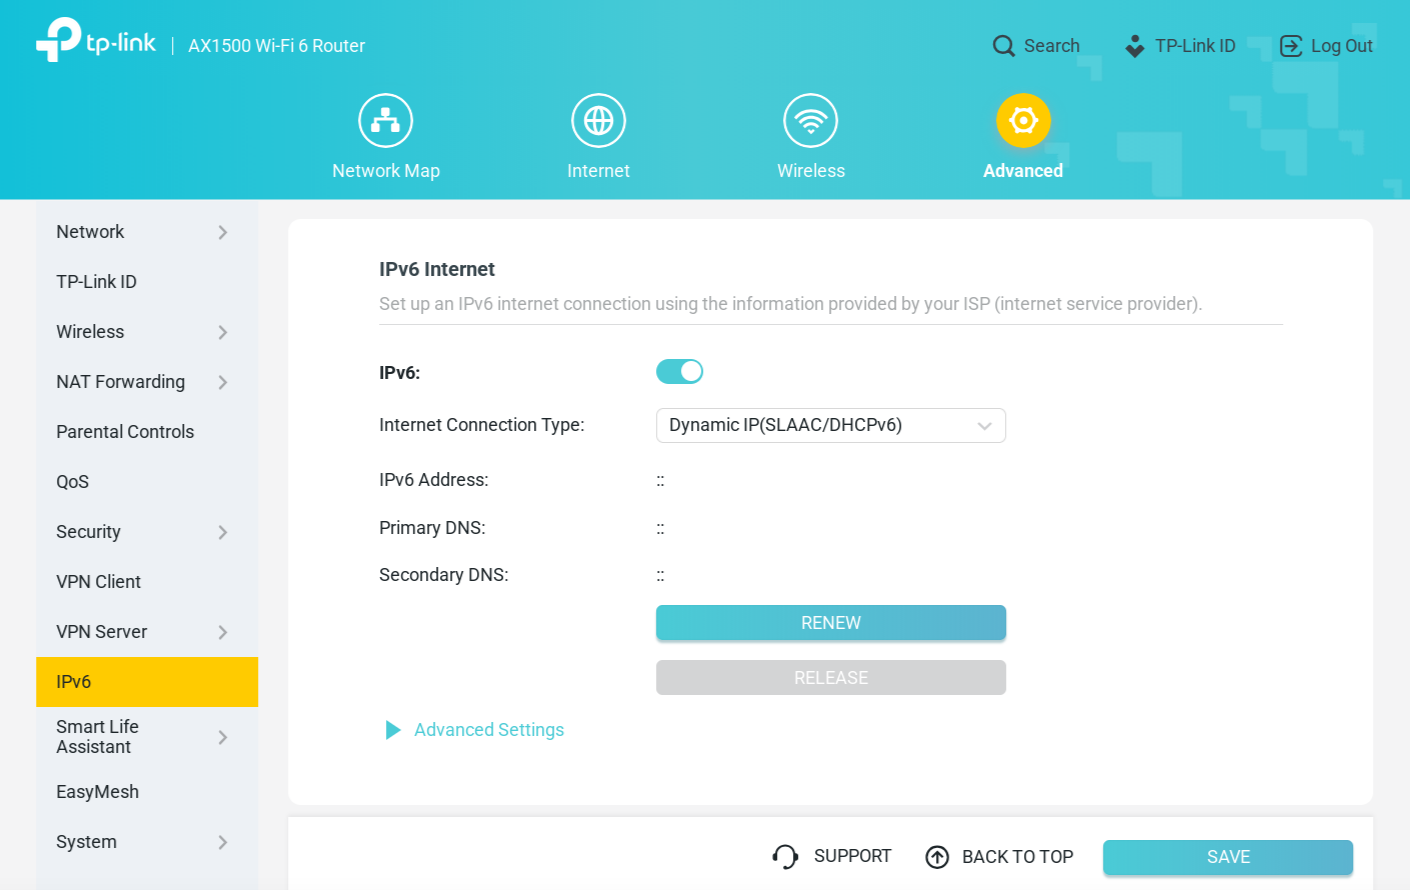
Recommended Modems/Routers
Confirmed applicable for models: AX10 (AX1500), AX53 (AX3000), AX73 (AX5400), BE230 (BE3600), BE550 (BE9300).
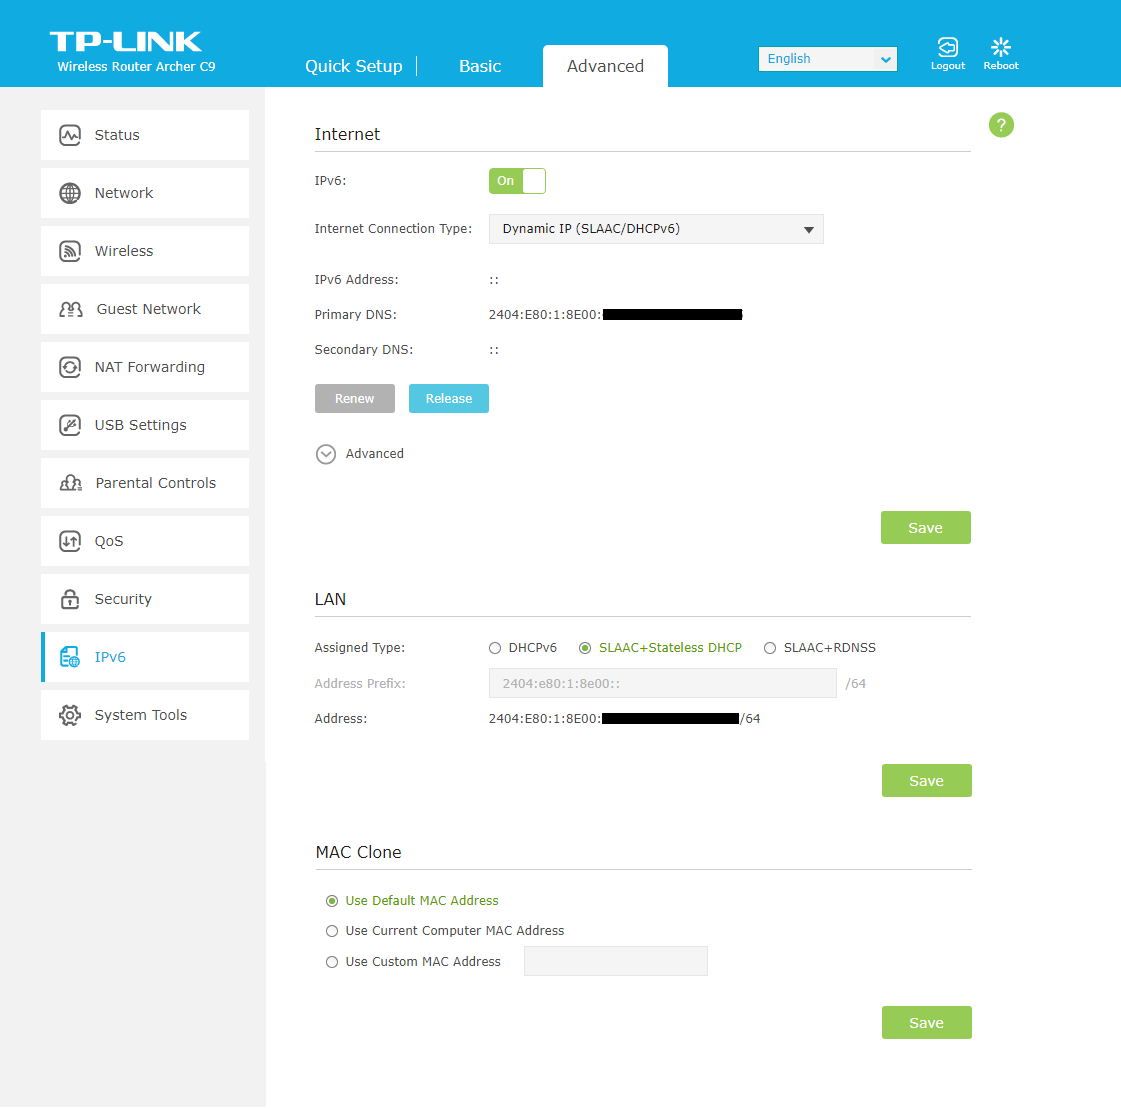
These TP-Link models do not enable IPv6 out of the box, and need to be manually enabled.
Head to http://tplinkwifi.net and log in with the password you used when setting up the device
From the circular options along the top, select Advanced
From the list of options along the left, select IPv6
Enable IPv6
From the Internet Connection Type dropdown, select Dynamic IP (SLAAC/DHCPv6)
Select SAVE on the bottom right
 |  |
 |
Source: Launtel
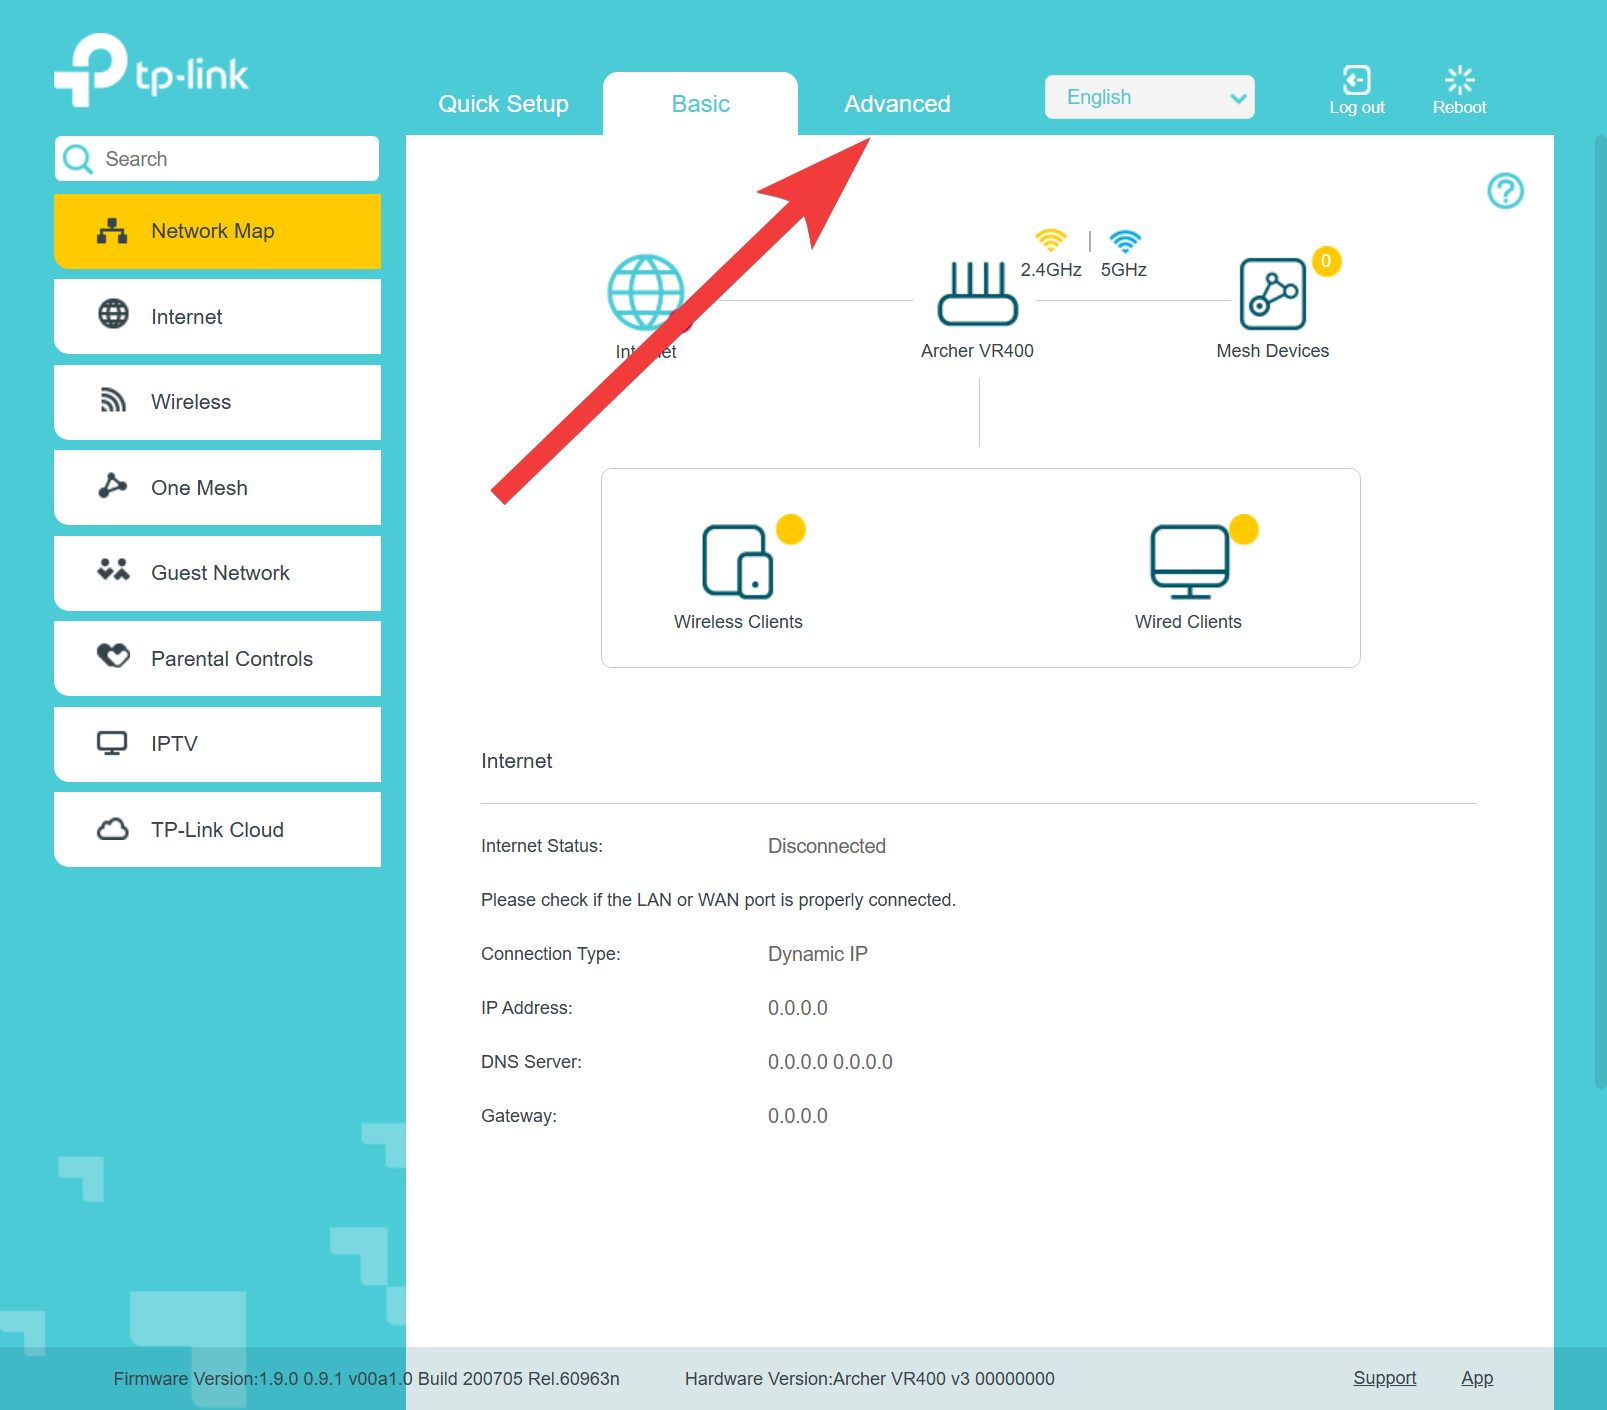
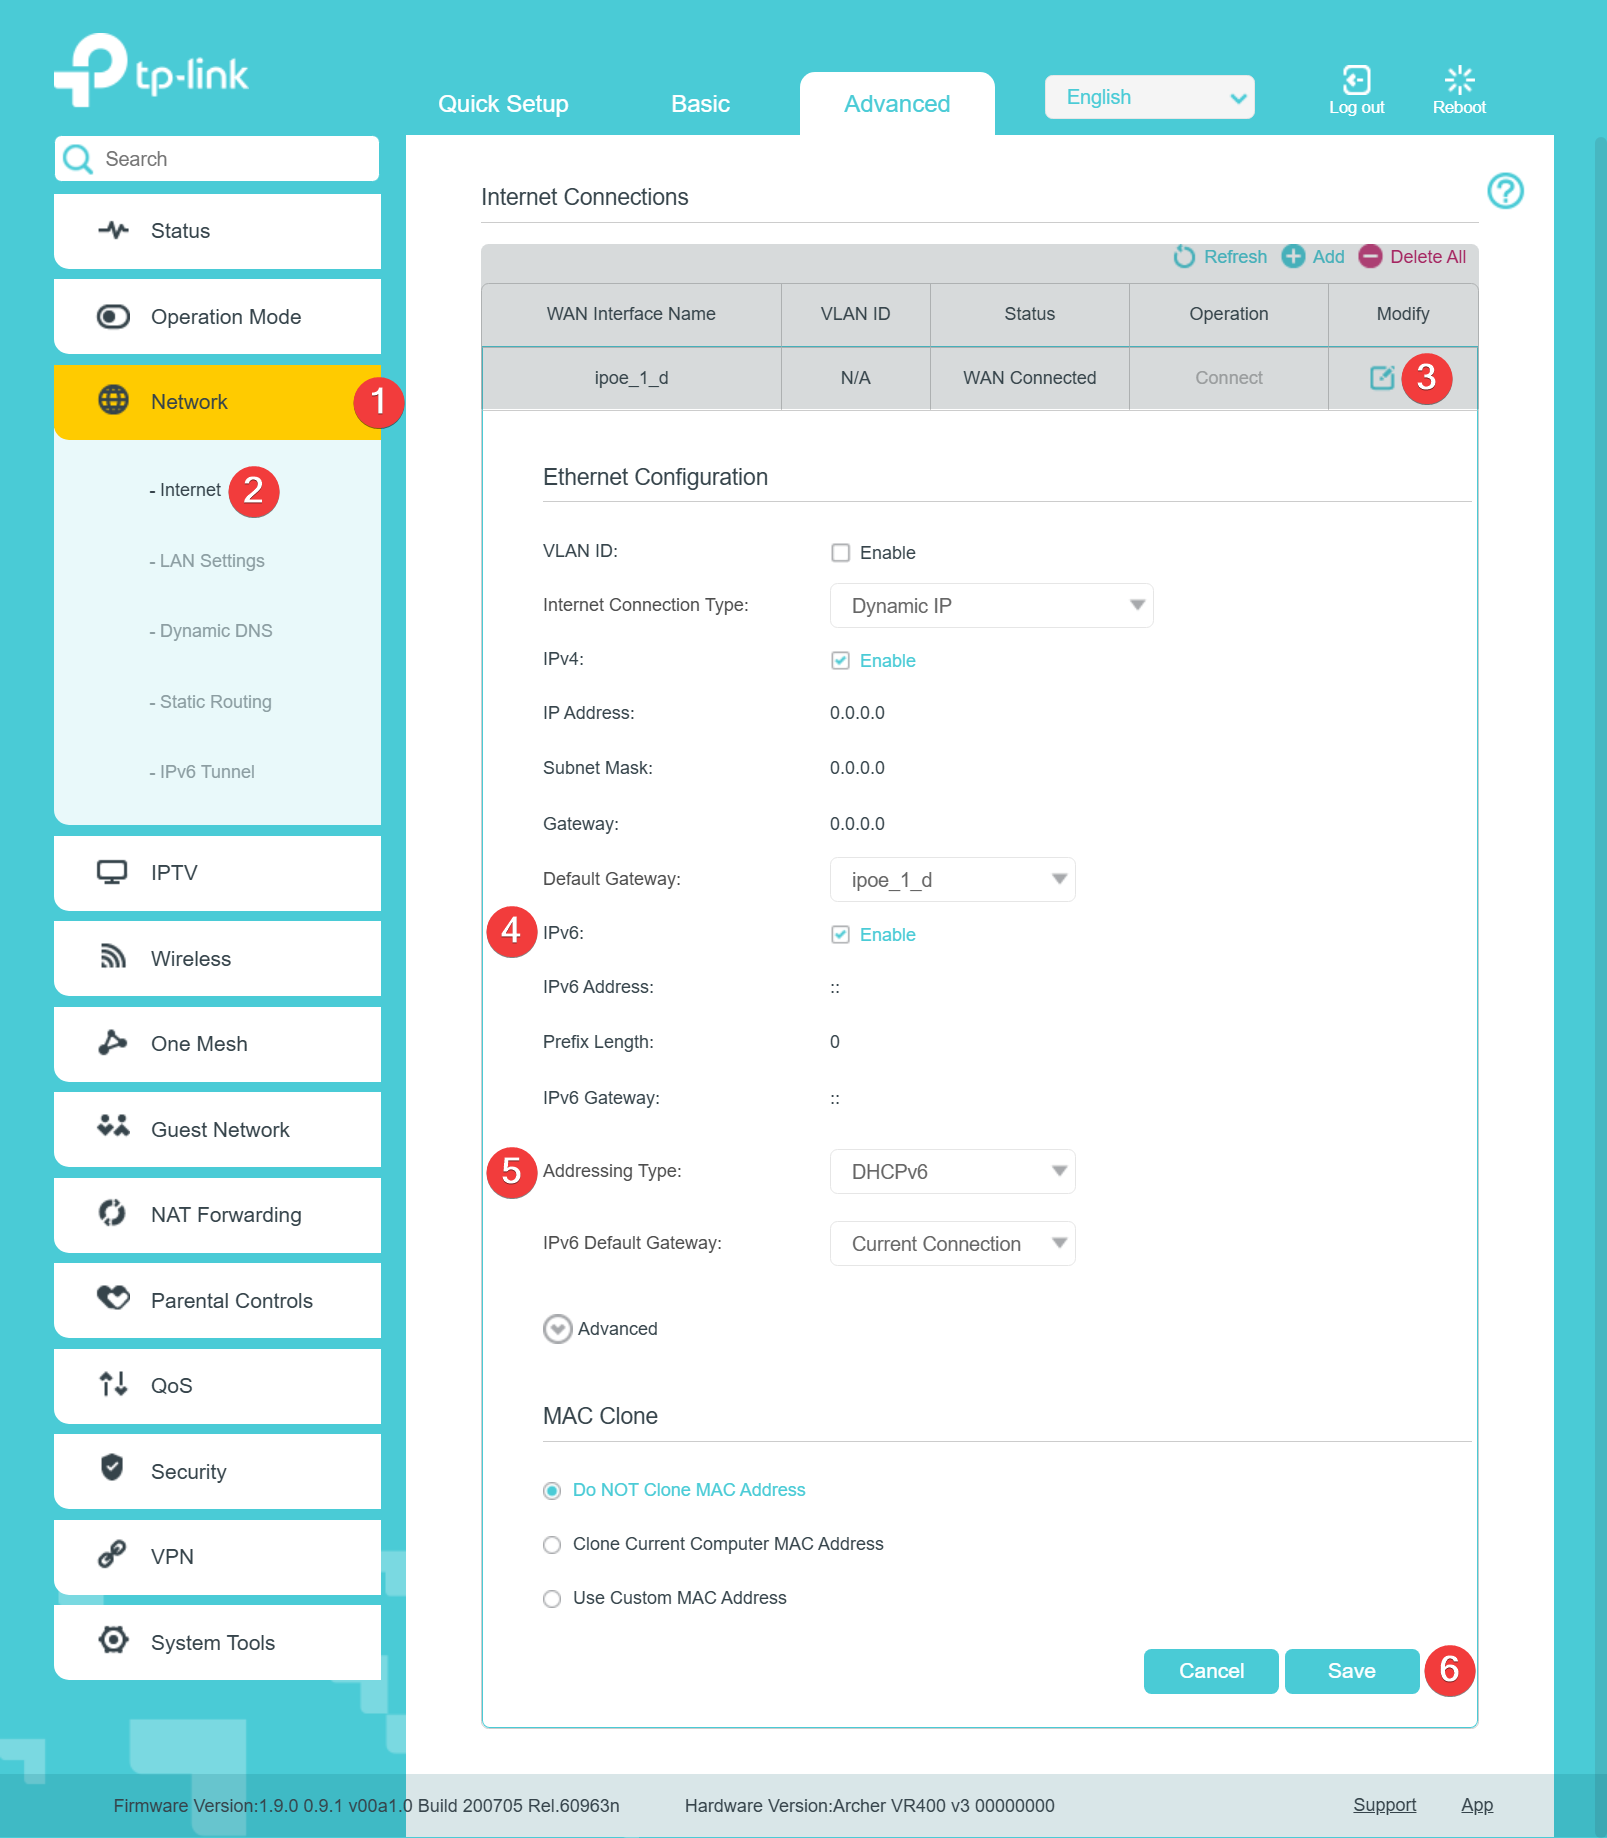
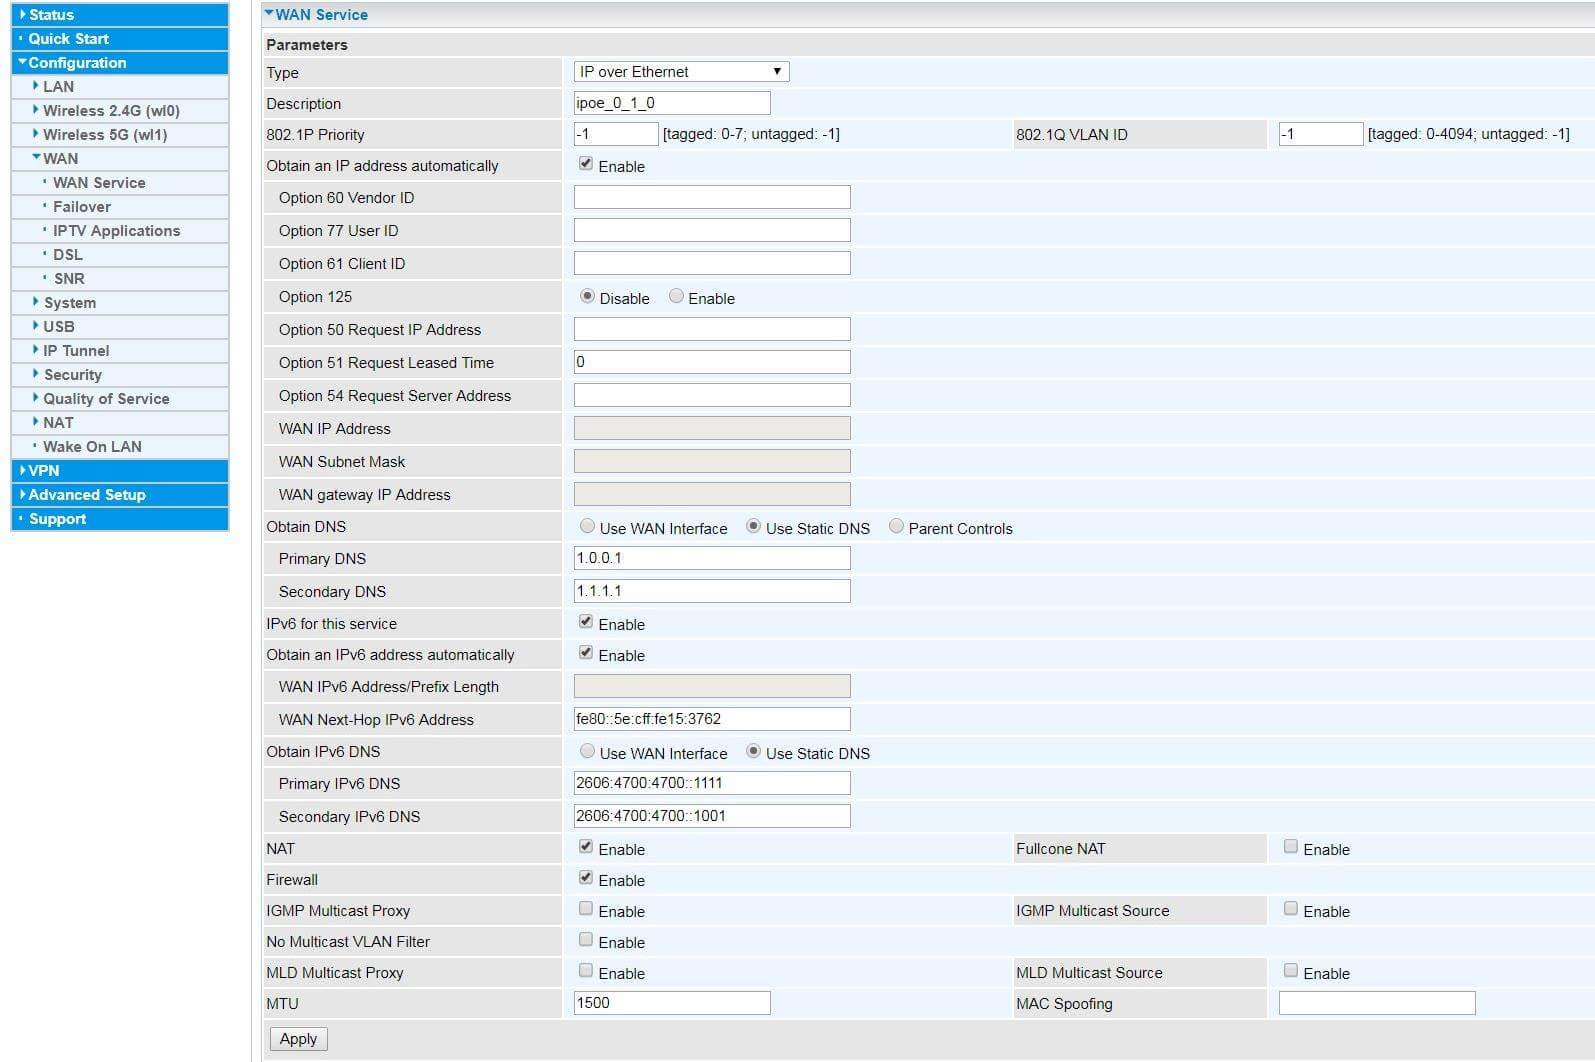
These TP-Link models do not enable IPv6 out of the box, and need to be manually enabled.
Head to http://tplinkmodem.net and log in with the password you used when setting up the device
From the options along the top, select Advanced
From the list of options along the left, select Network
From the Network drop-down menu, select Internet
In the Internet Connections table, click the edit icon under Modify (Pencil icon)
In the Ethernet Configuration options, tick IPv6
From the Addressing Type dropdown, select DHCPv6
Select Save on the bottom right
 |
 |
Source: Launtel
Common Modems/Routers
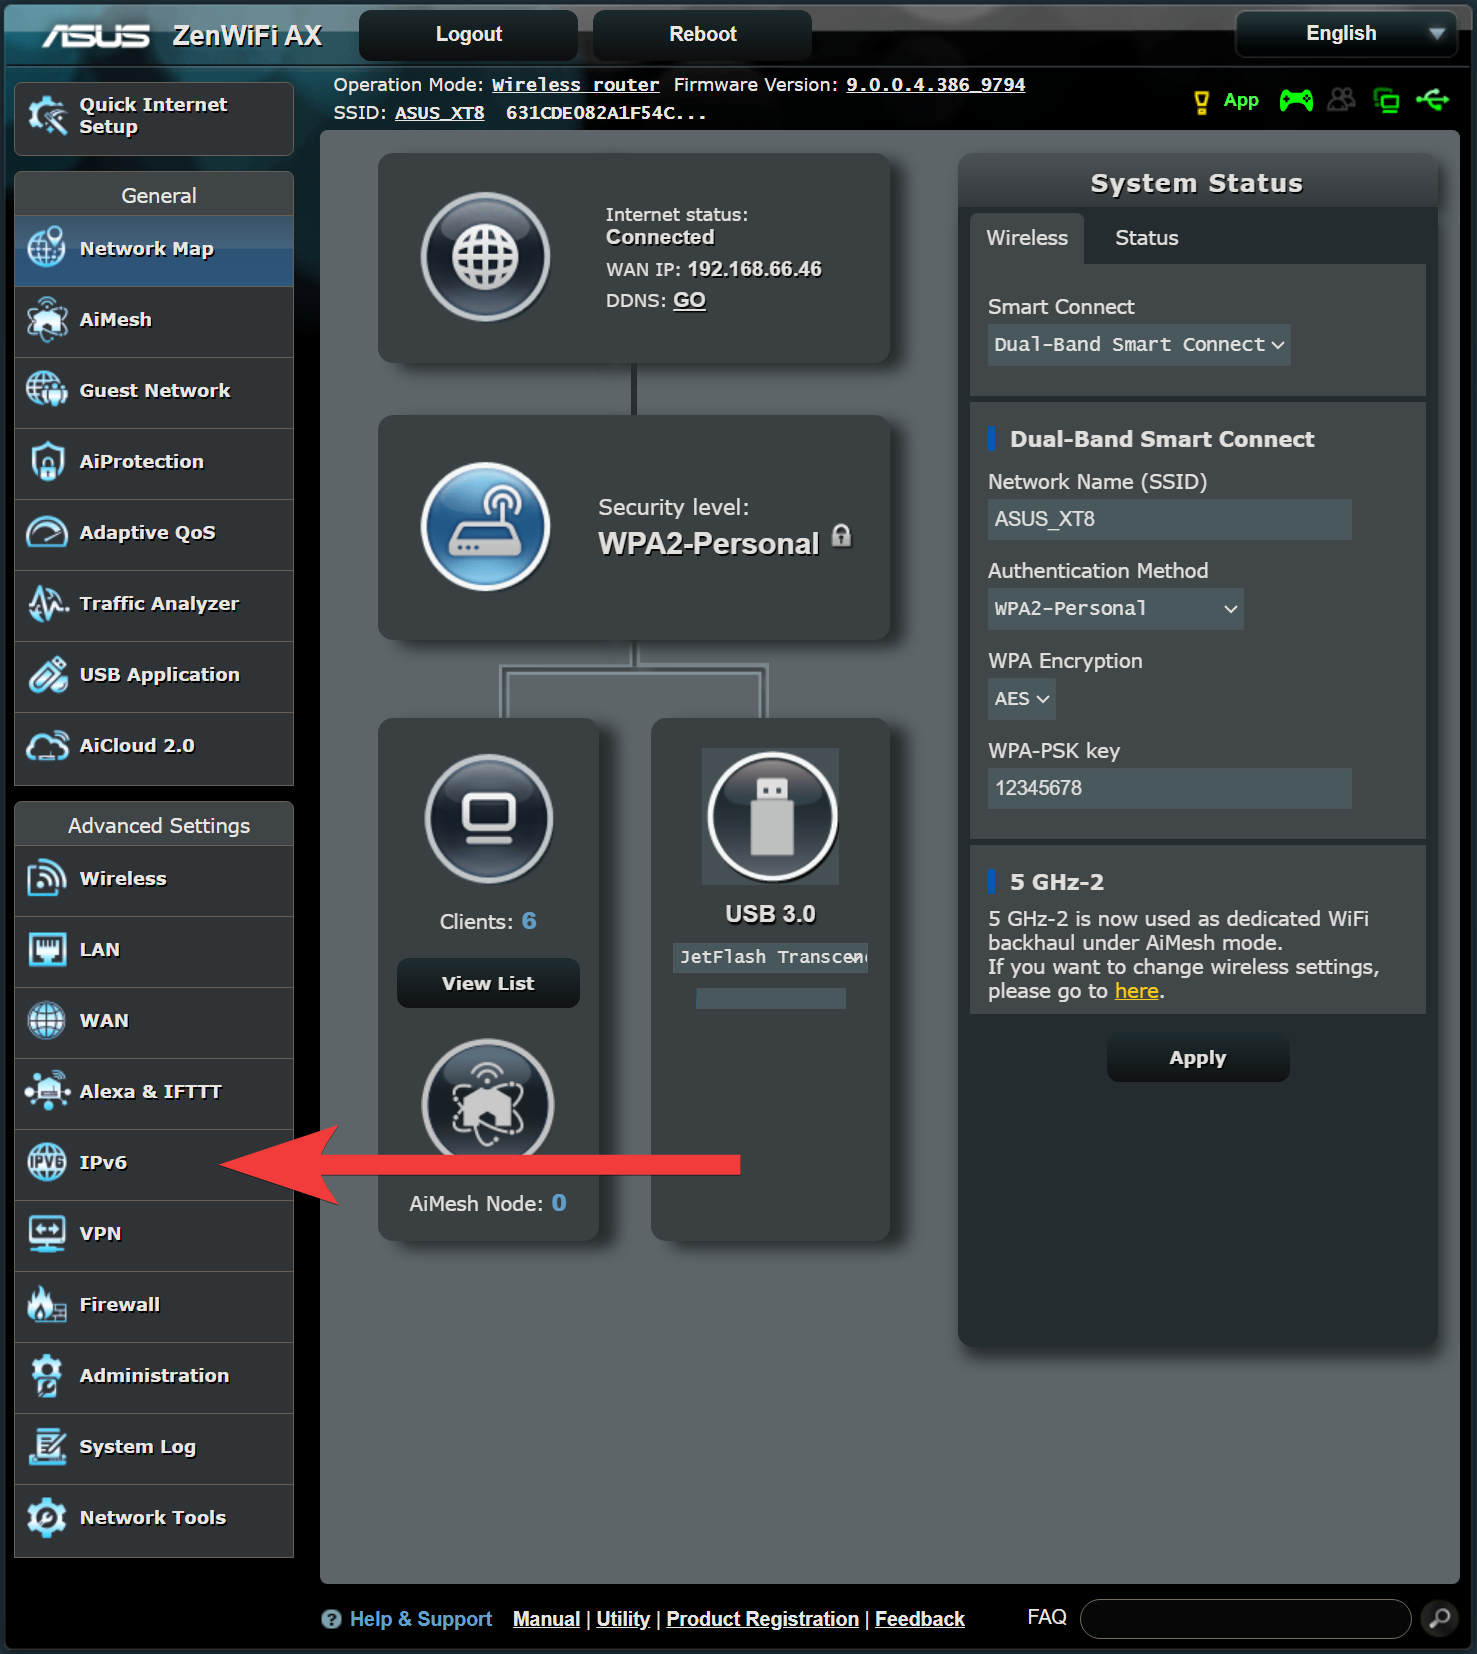
Confirmed applicable for models: RT-AC68U (AC1900), ZenWiFi XT8 (AX6600), and any devices flashed with Merlin firmware.
Head to http://www.asusrouter.com and log in with the password you used when setting up the device
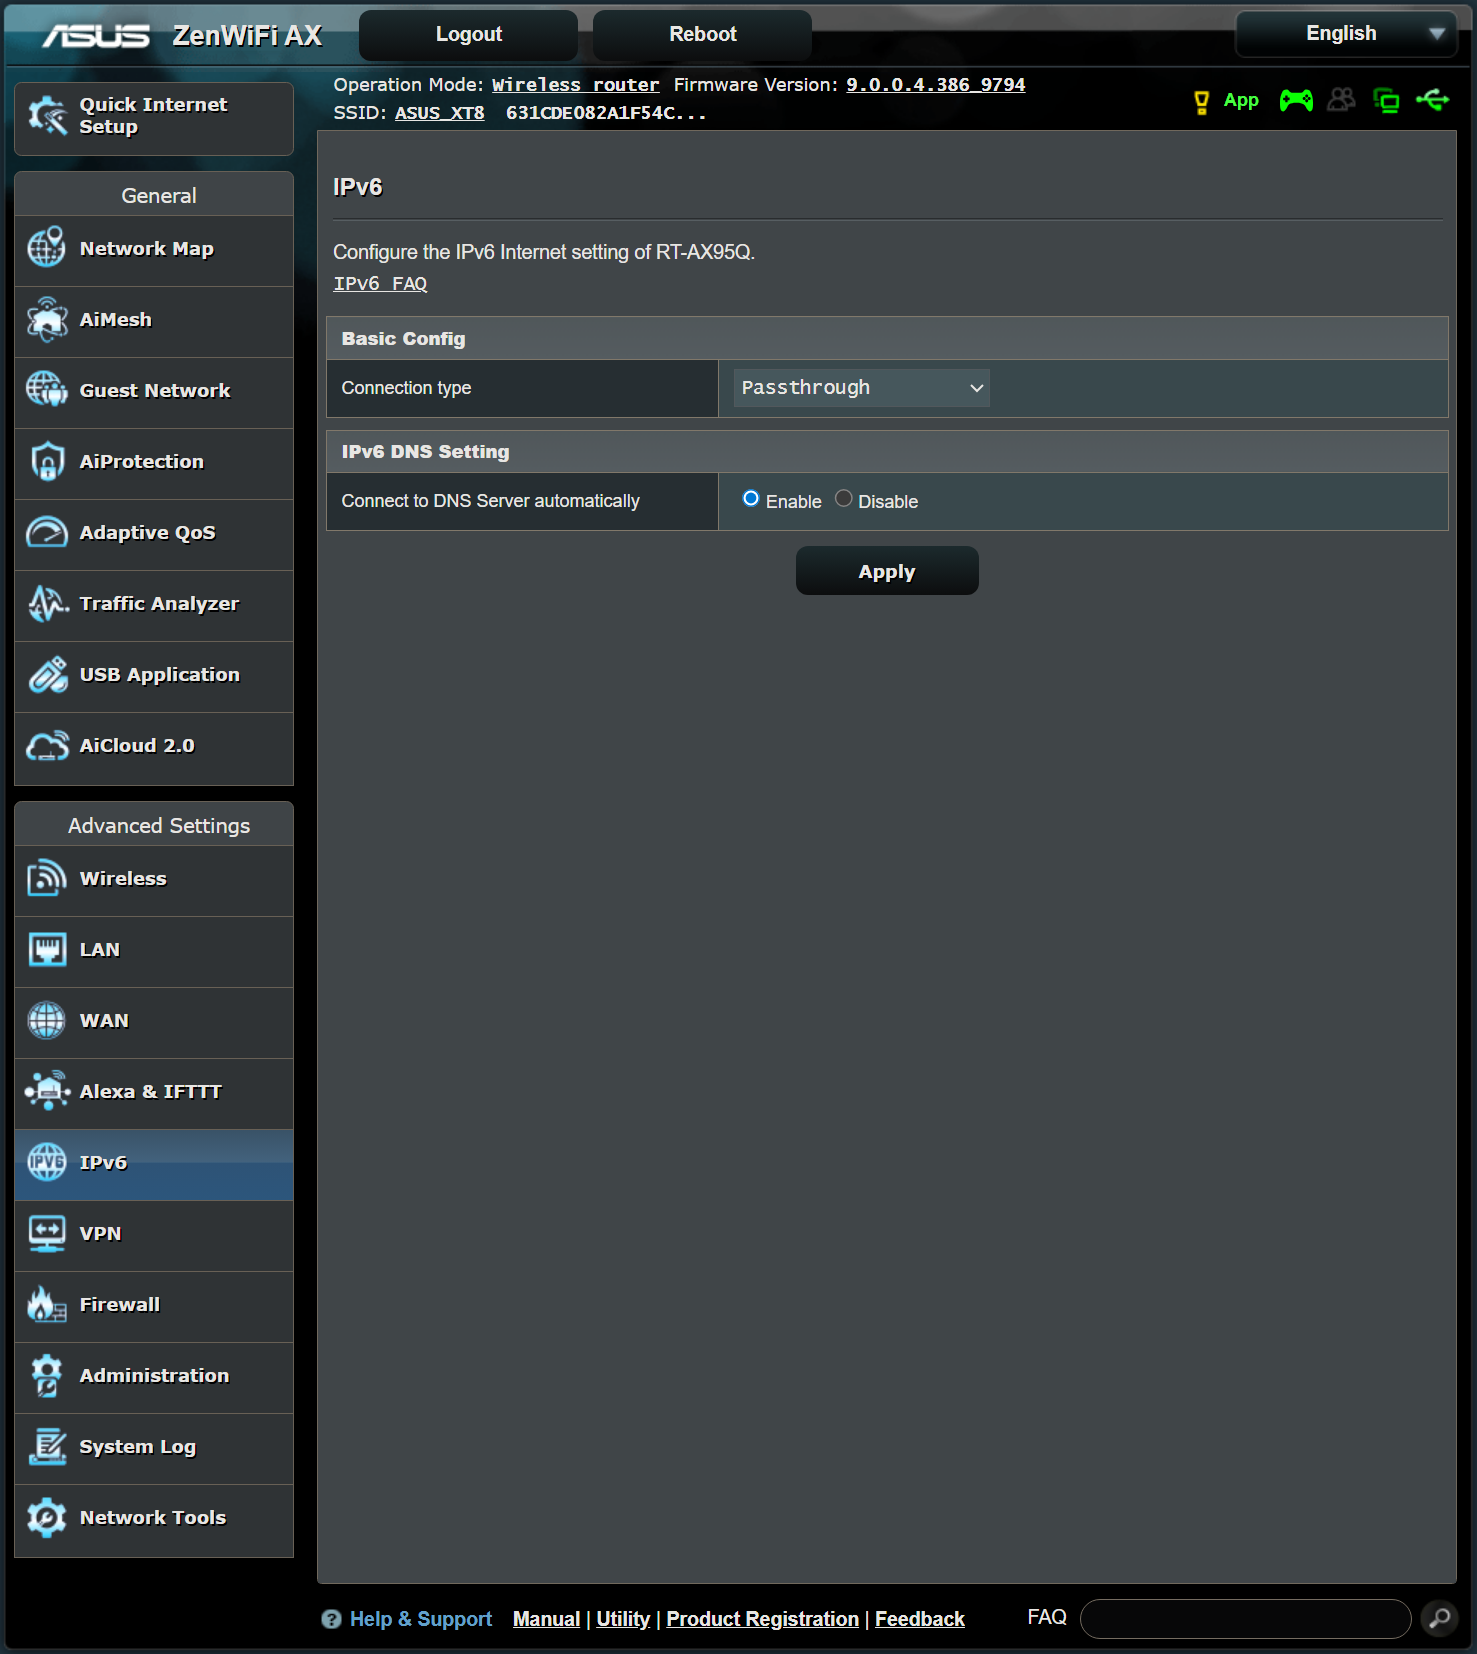
From the list of Advanced Settings along the left, select IPv6
Enable IPv6
From the Connection Type dropdown, select Passthrough
Connect to DNS Server automatically: Enable
Select Apply down the bottom
 |  |
Source: ASUS Demo UI
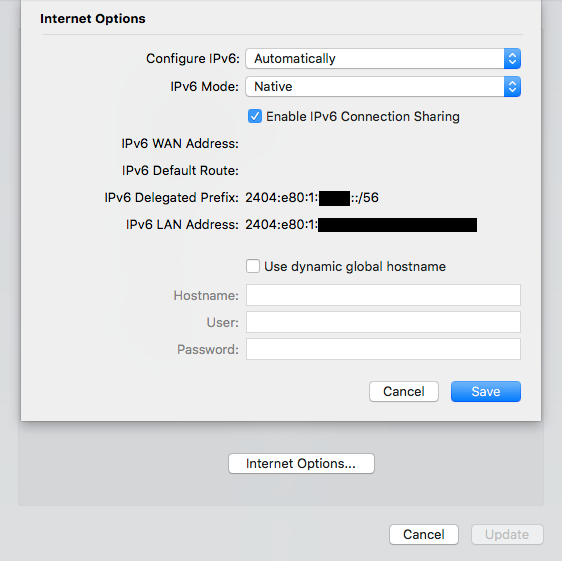
Apple has instructions on how to enable this on a Mac here:
https://support.apple.com/en-au/guide/aputility/aprt2706/mac
Our settings should look like this:
 Source: Apple Knowledge Base
Note that the DNS settings are different here.
Obtain IPv6 DNS: Use WAN Interface
Firmware: 2.52.d24
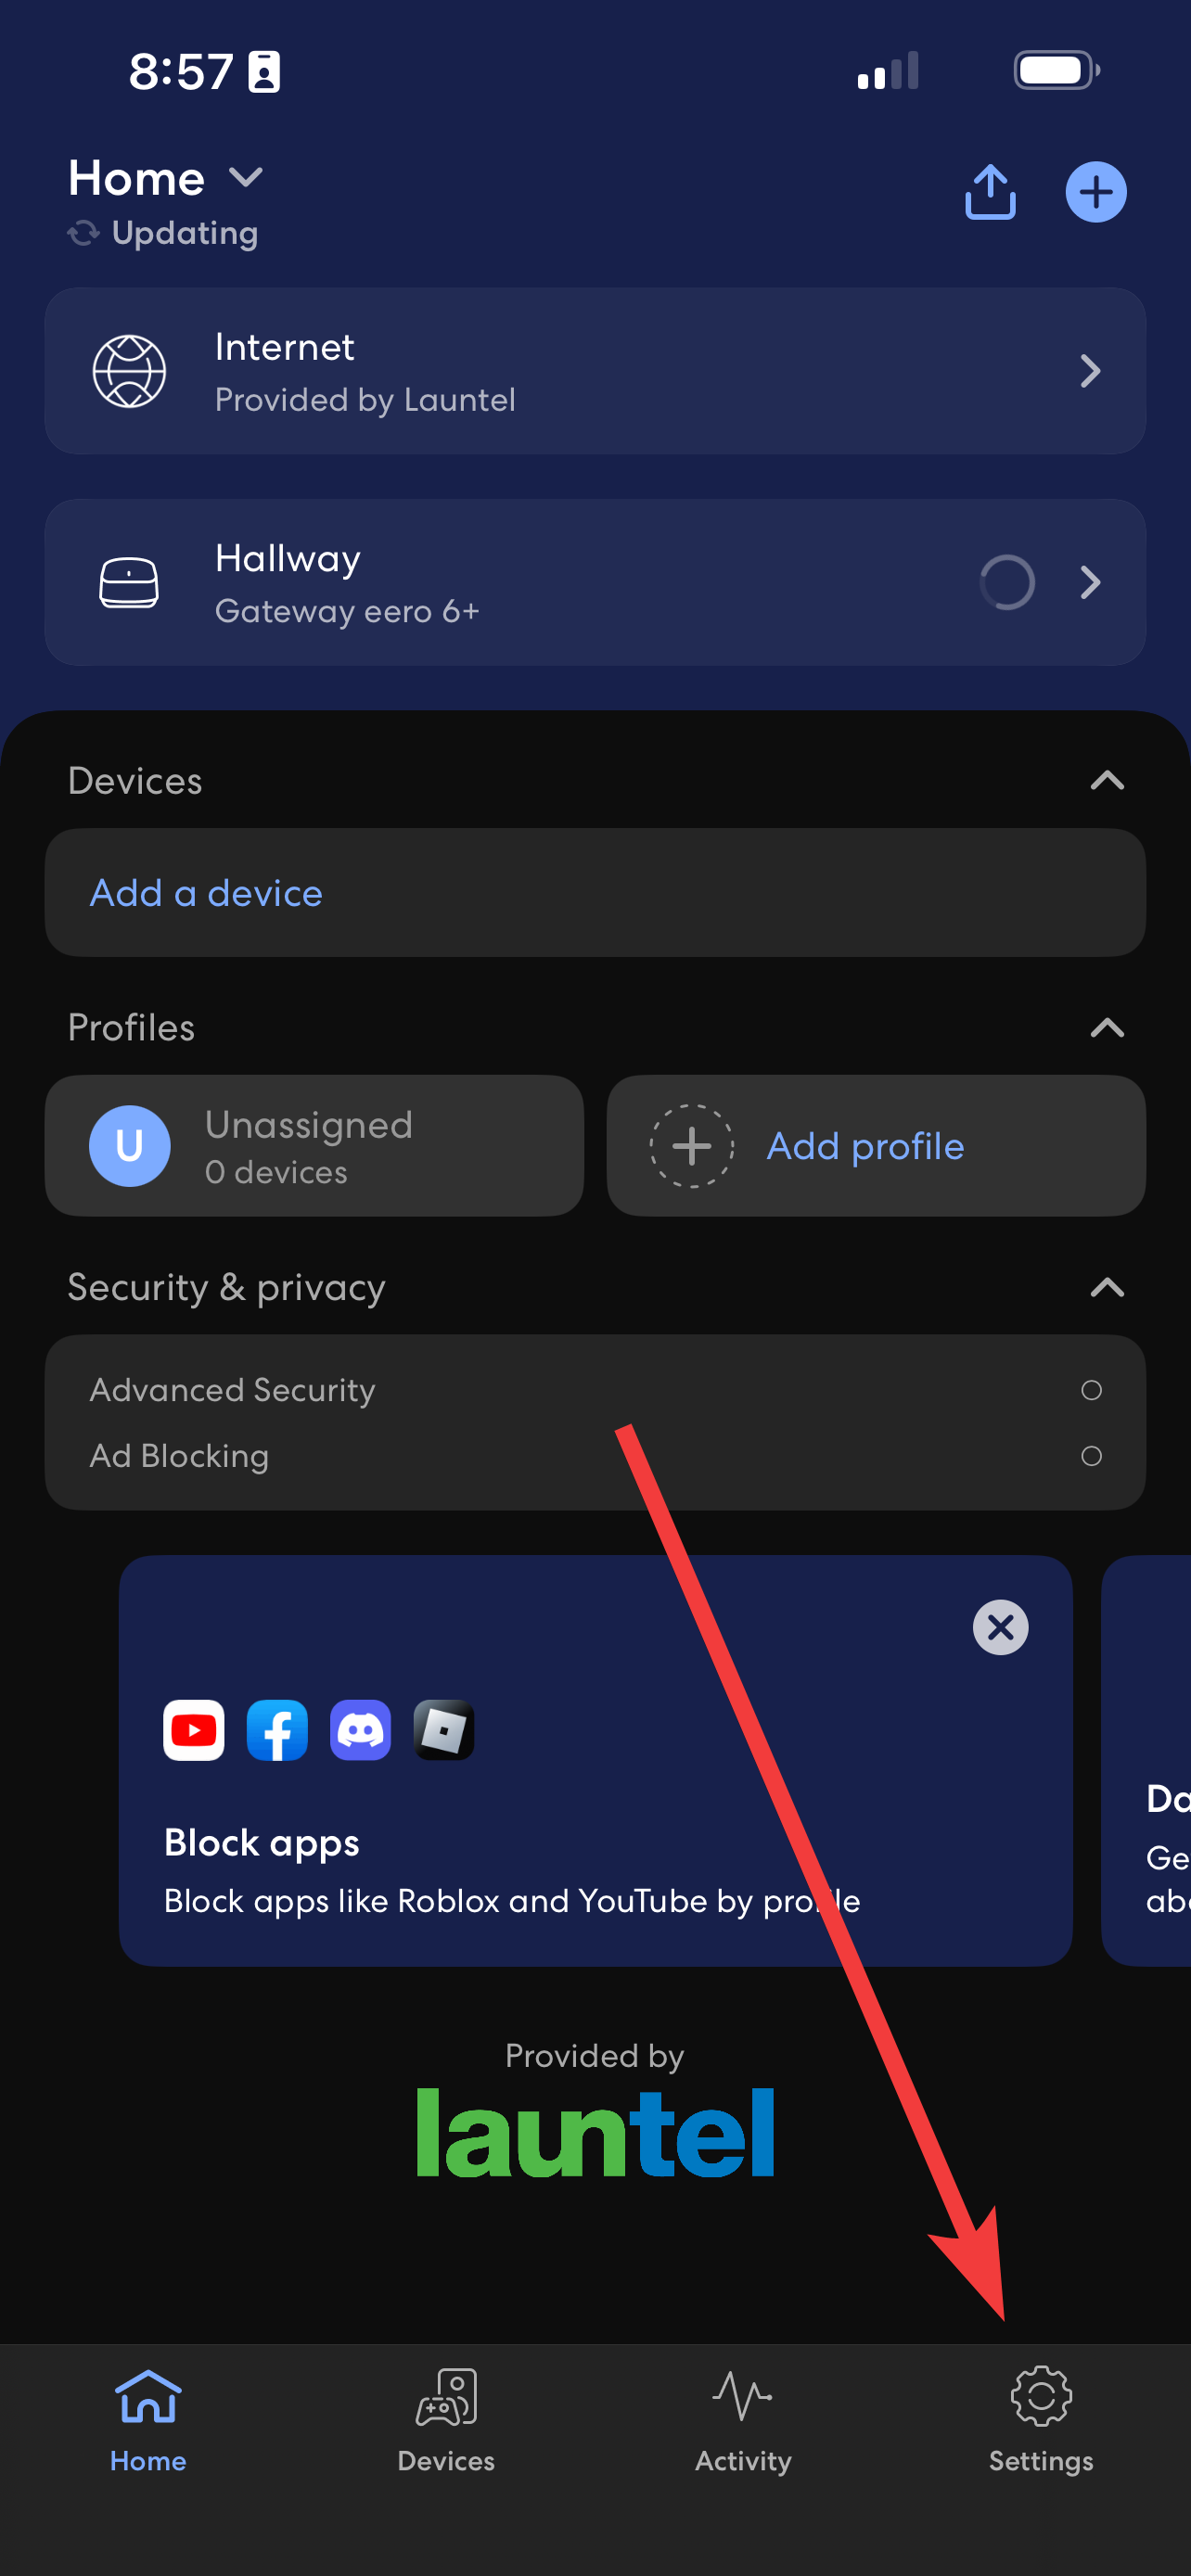
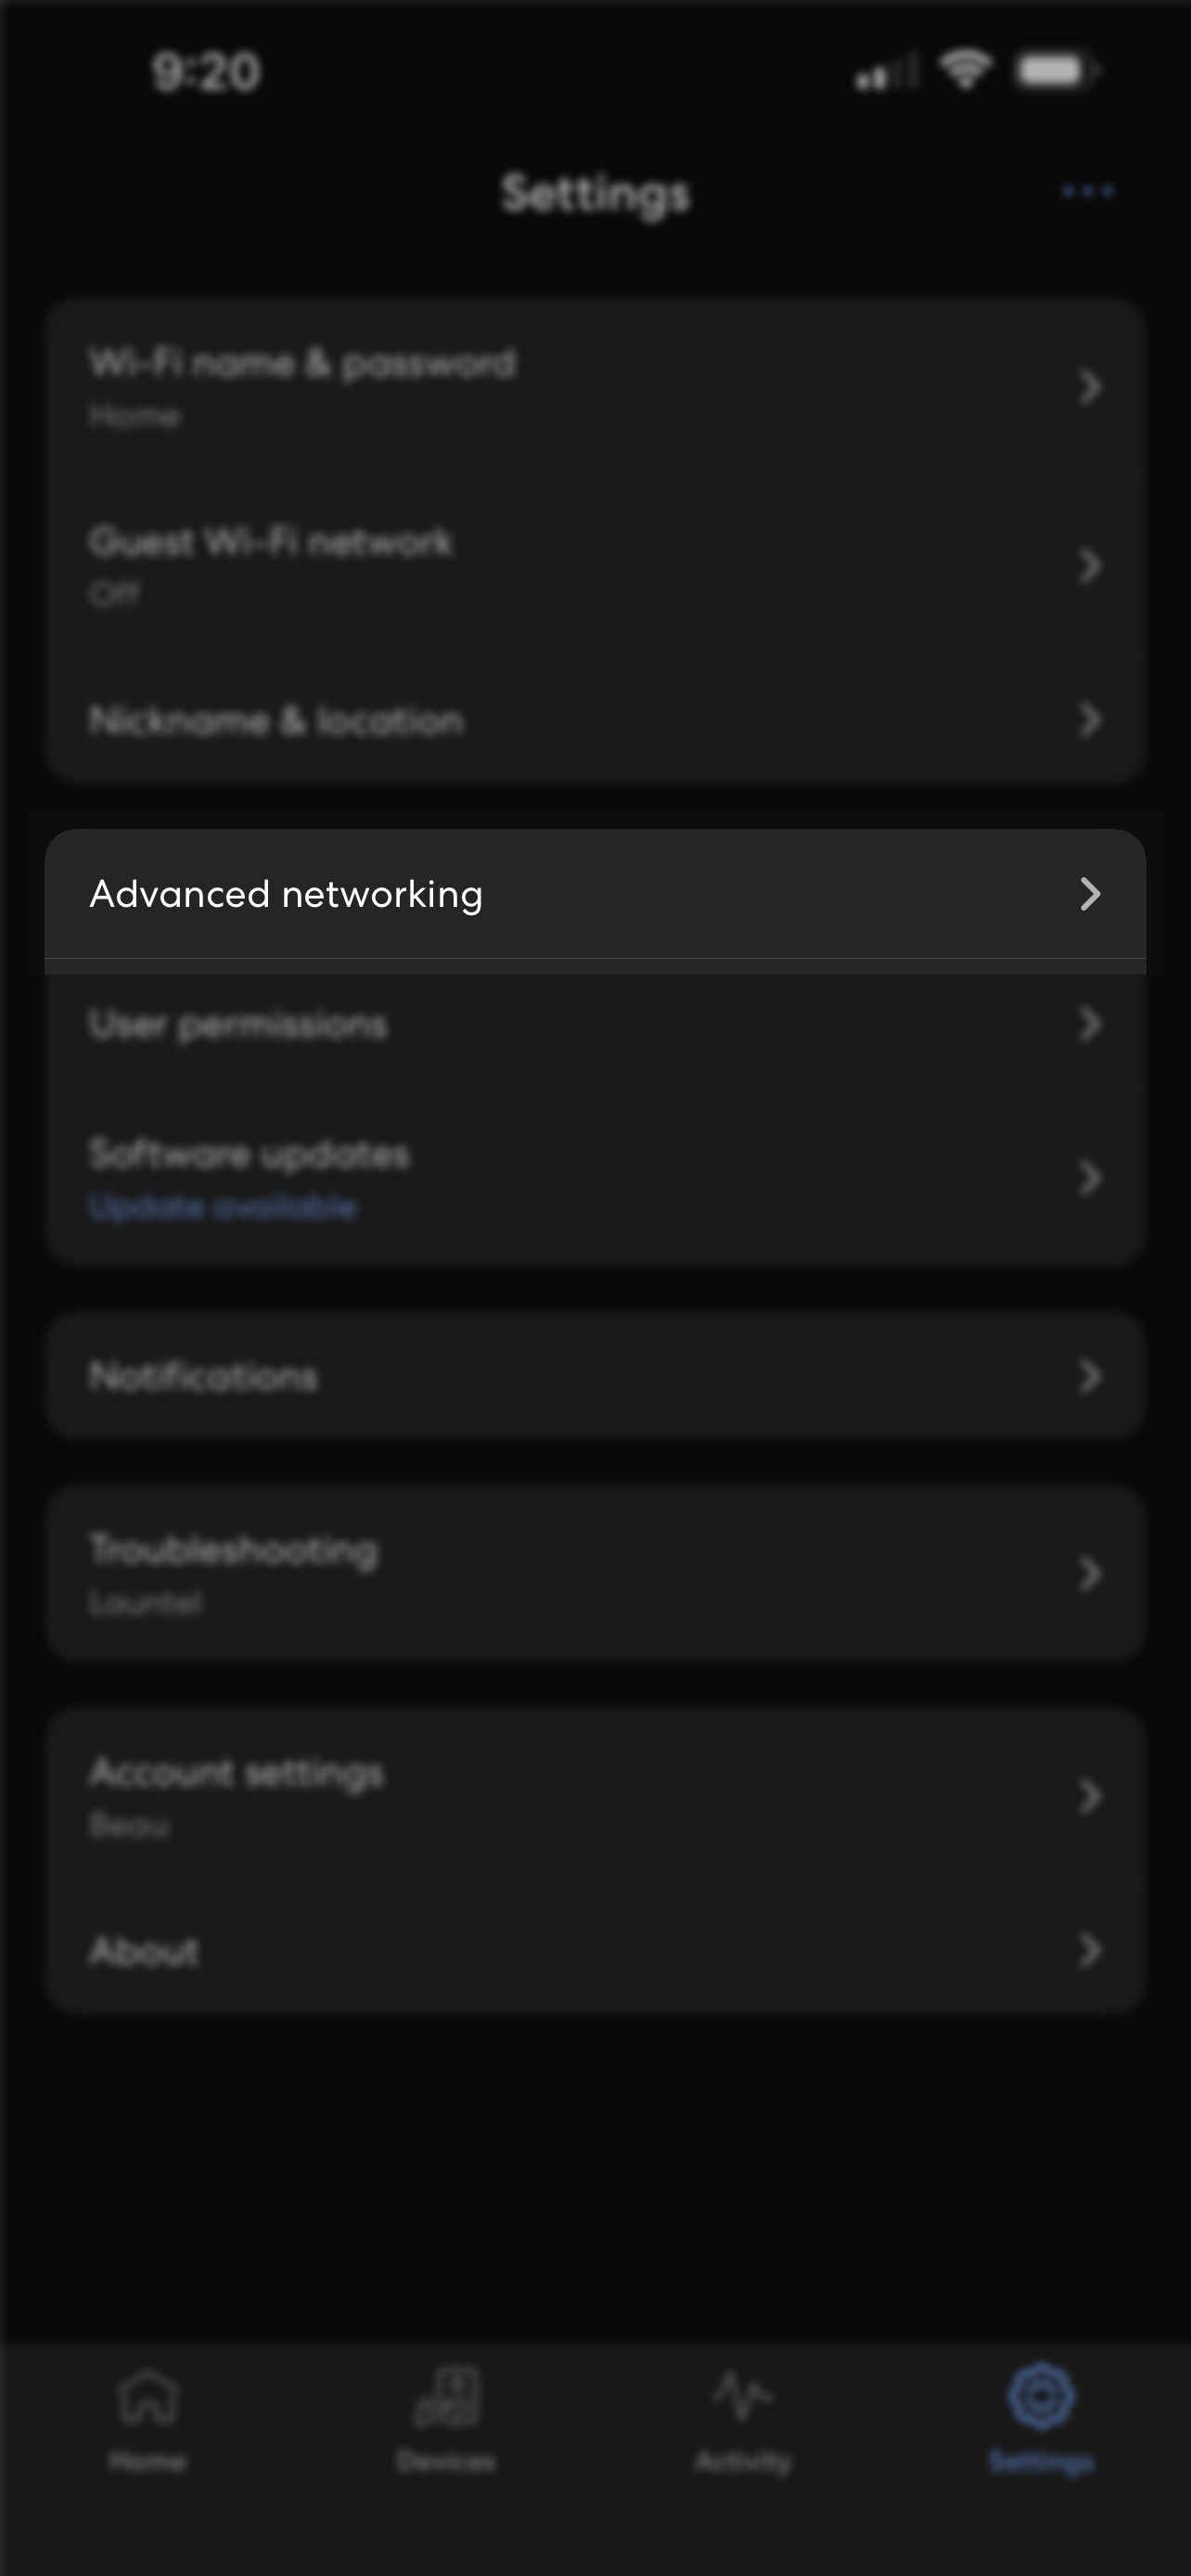
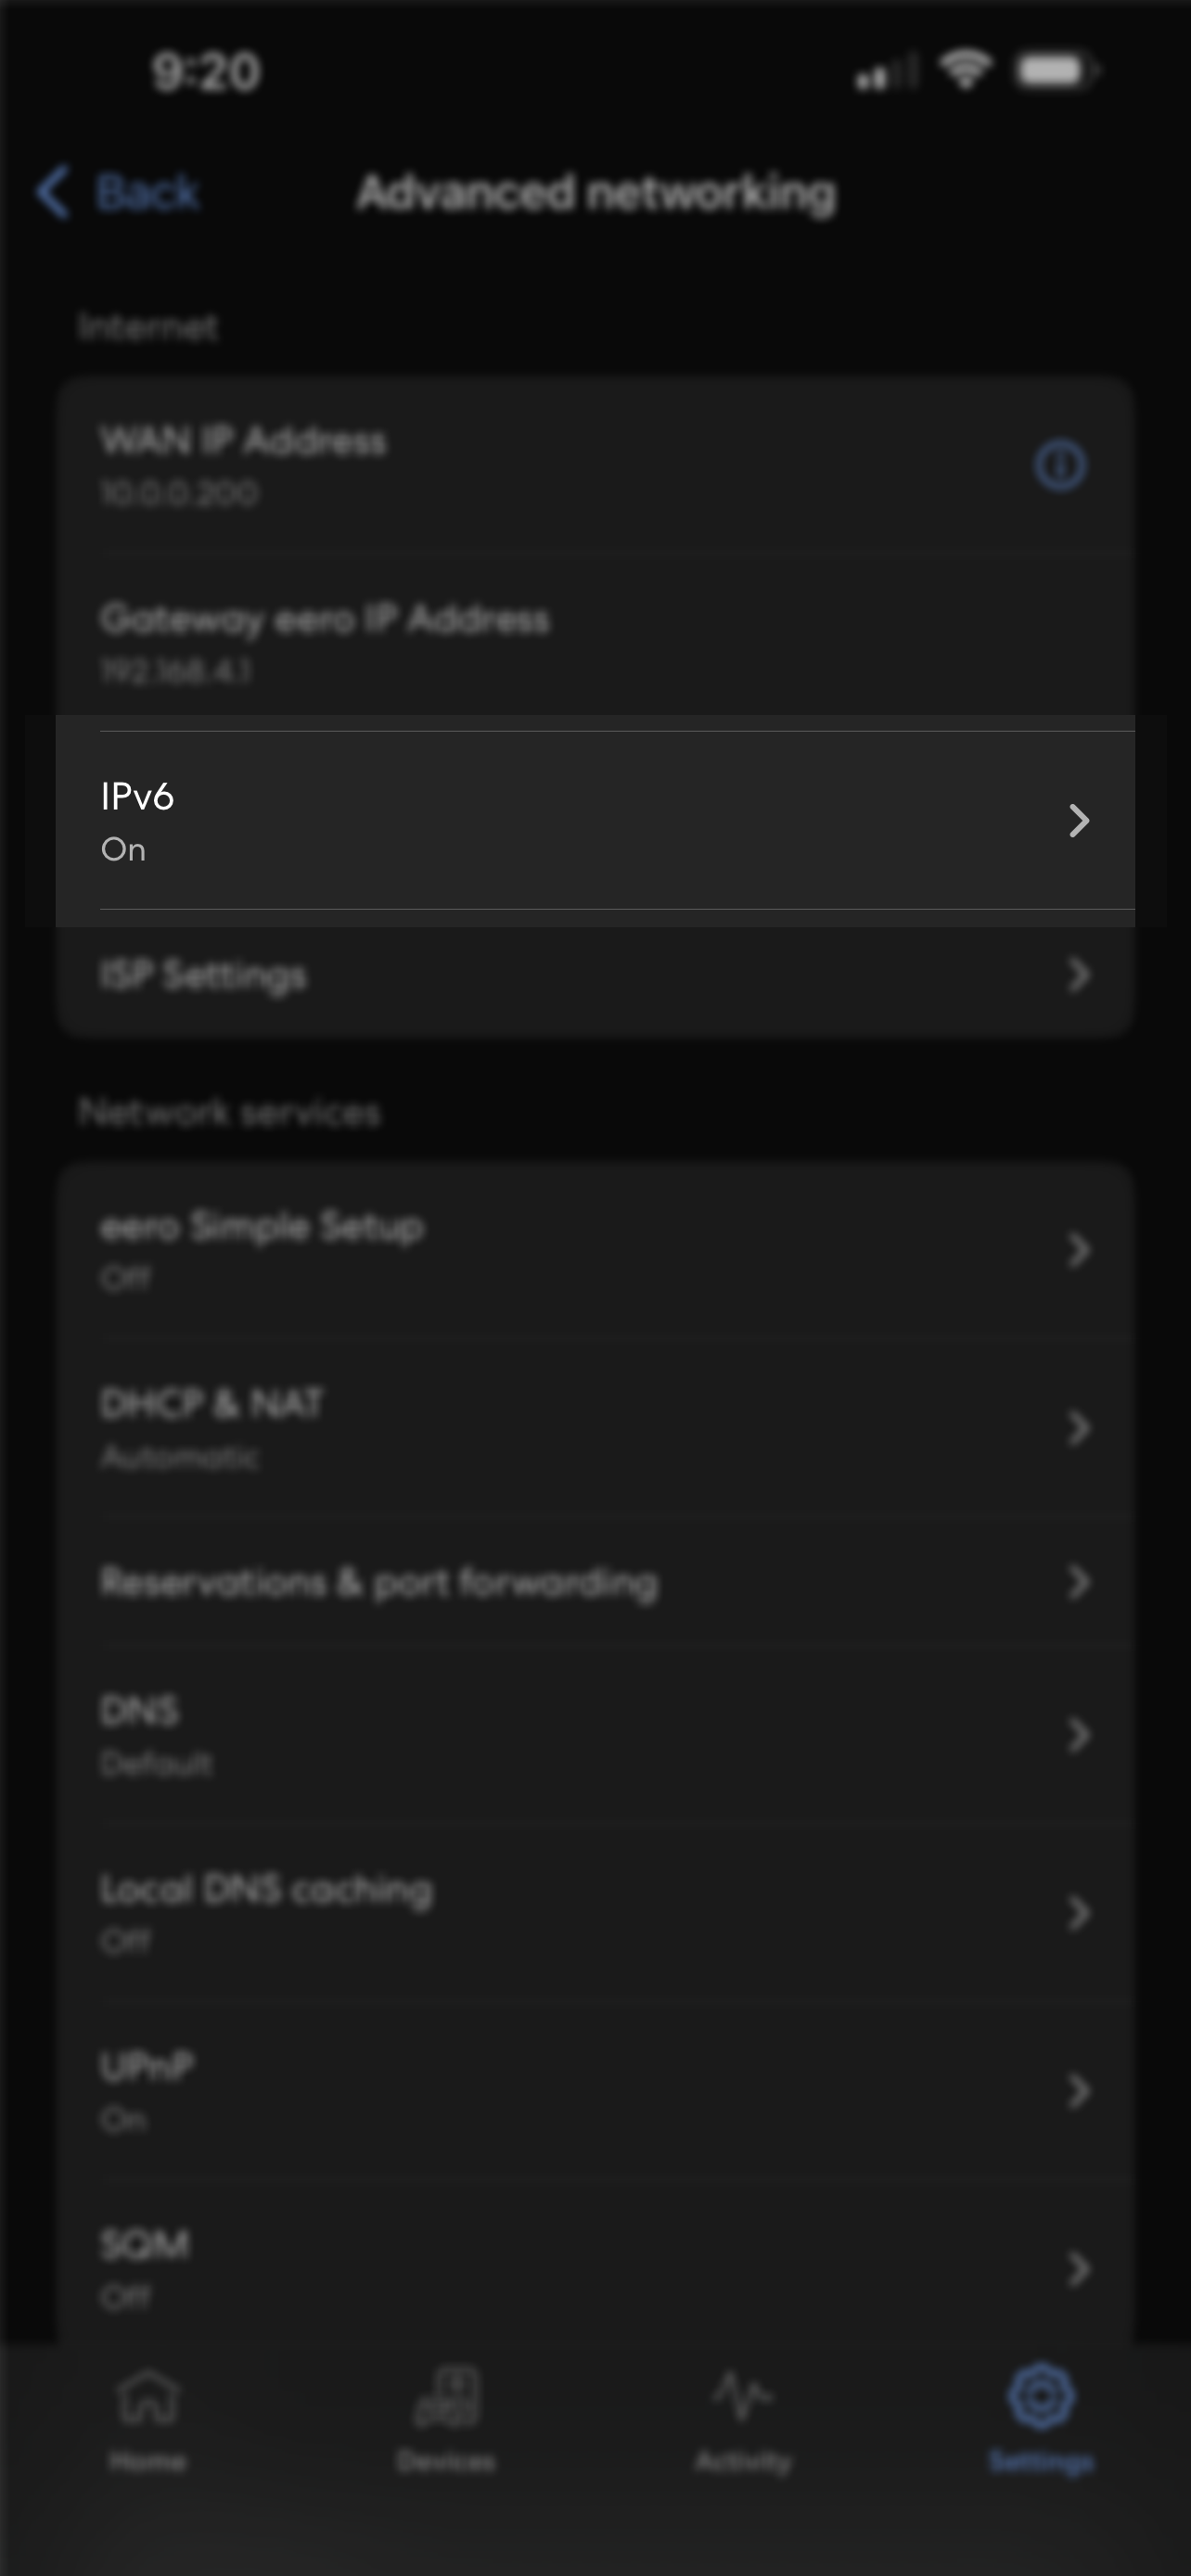
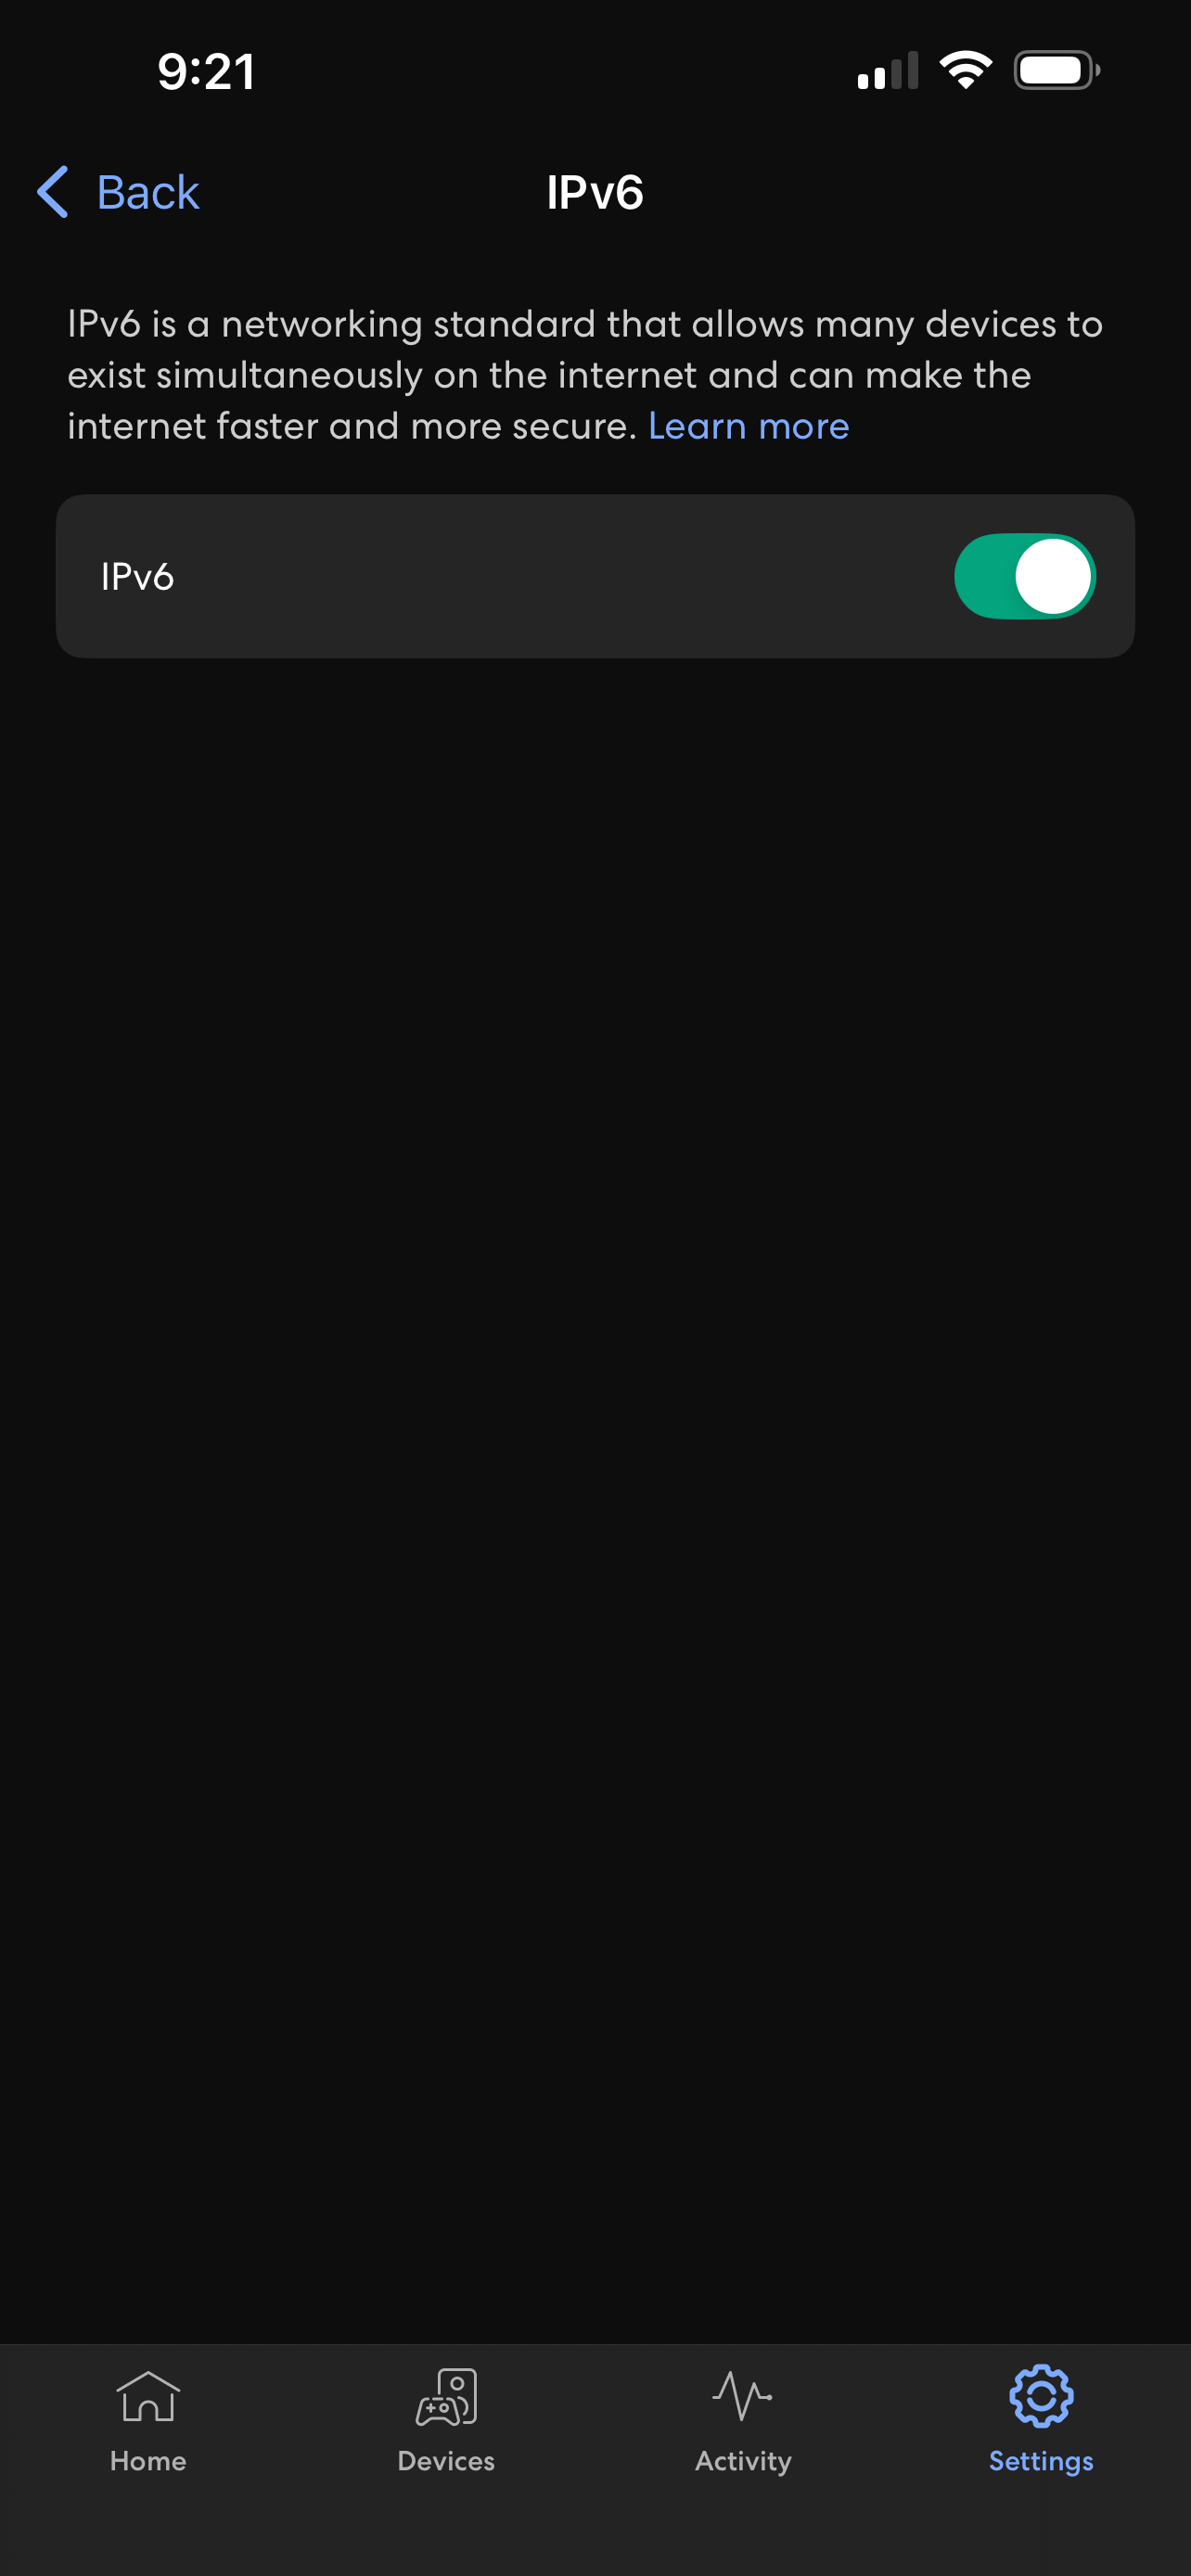
By default, eero devices should have IPv6 enabled. Using the eero wifi system app (App Store, Play Store), confirm by going to:
Settings > Advanced networking > IPv6 > Slider is enabled.
 |  |
 |  |
Source: Launtel
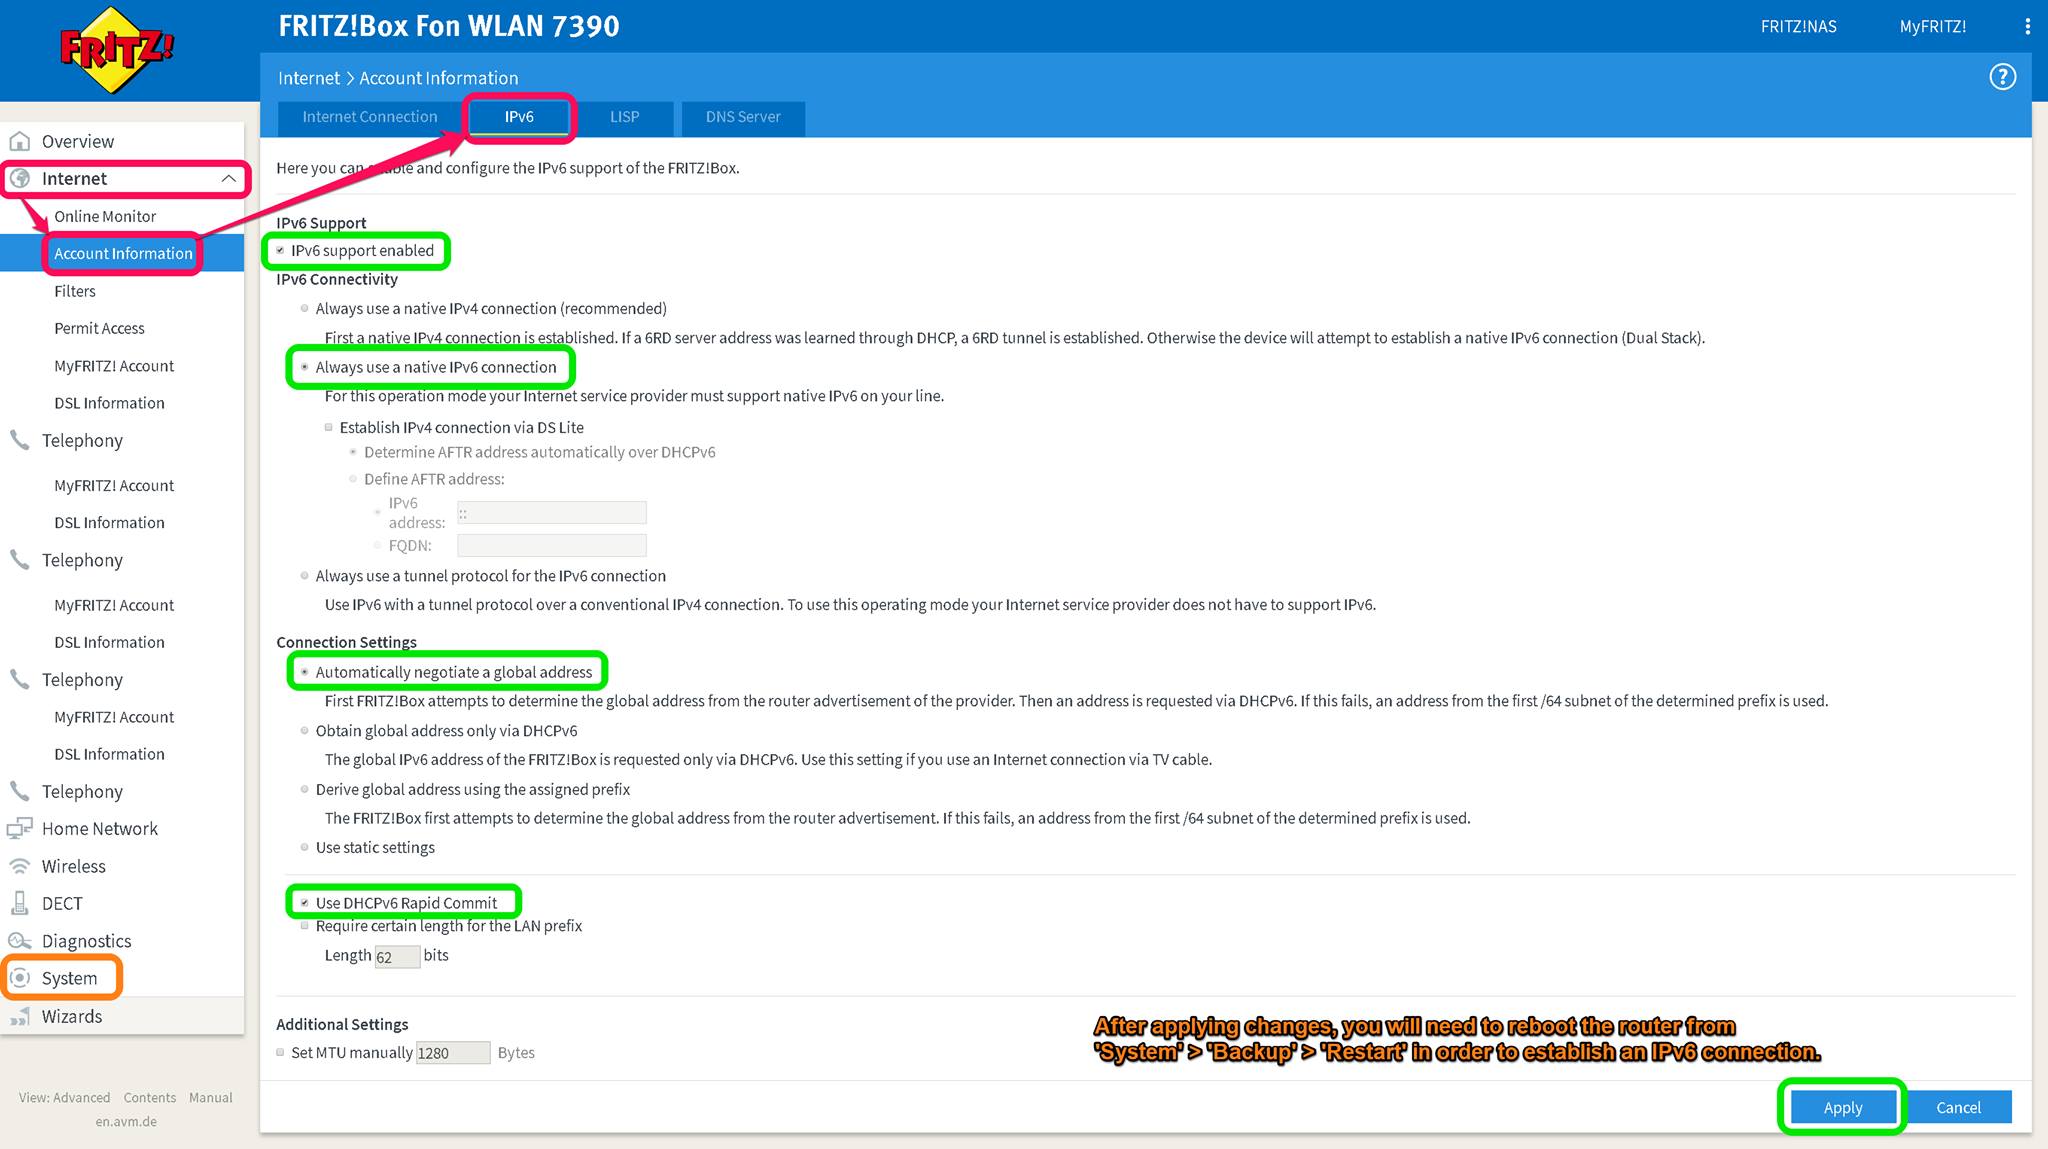
Confirmed applicable for models: 7390 & 7490
Head to http://fritz.box and log in with the password you used when setting up the device
From the list of options along the left, select Internet
From the dropdown menu, select Account Information
Along the top navigation bar, select IPv6
Enable: IPv6 support enabled
Enable: Always use a native IPv6 connection
Enable: Automatically negotiate a global address
Enable: Use DHCPv6 Raid Commit
Click Apply down the bottom right
From the list of options along the left, select System
Navigate to the Backup page
Restart the router
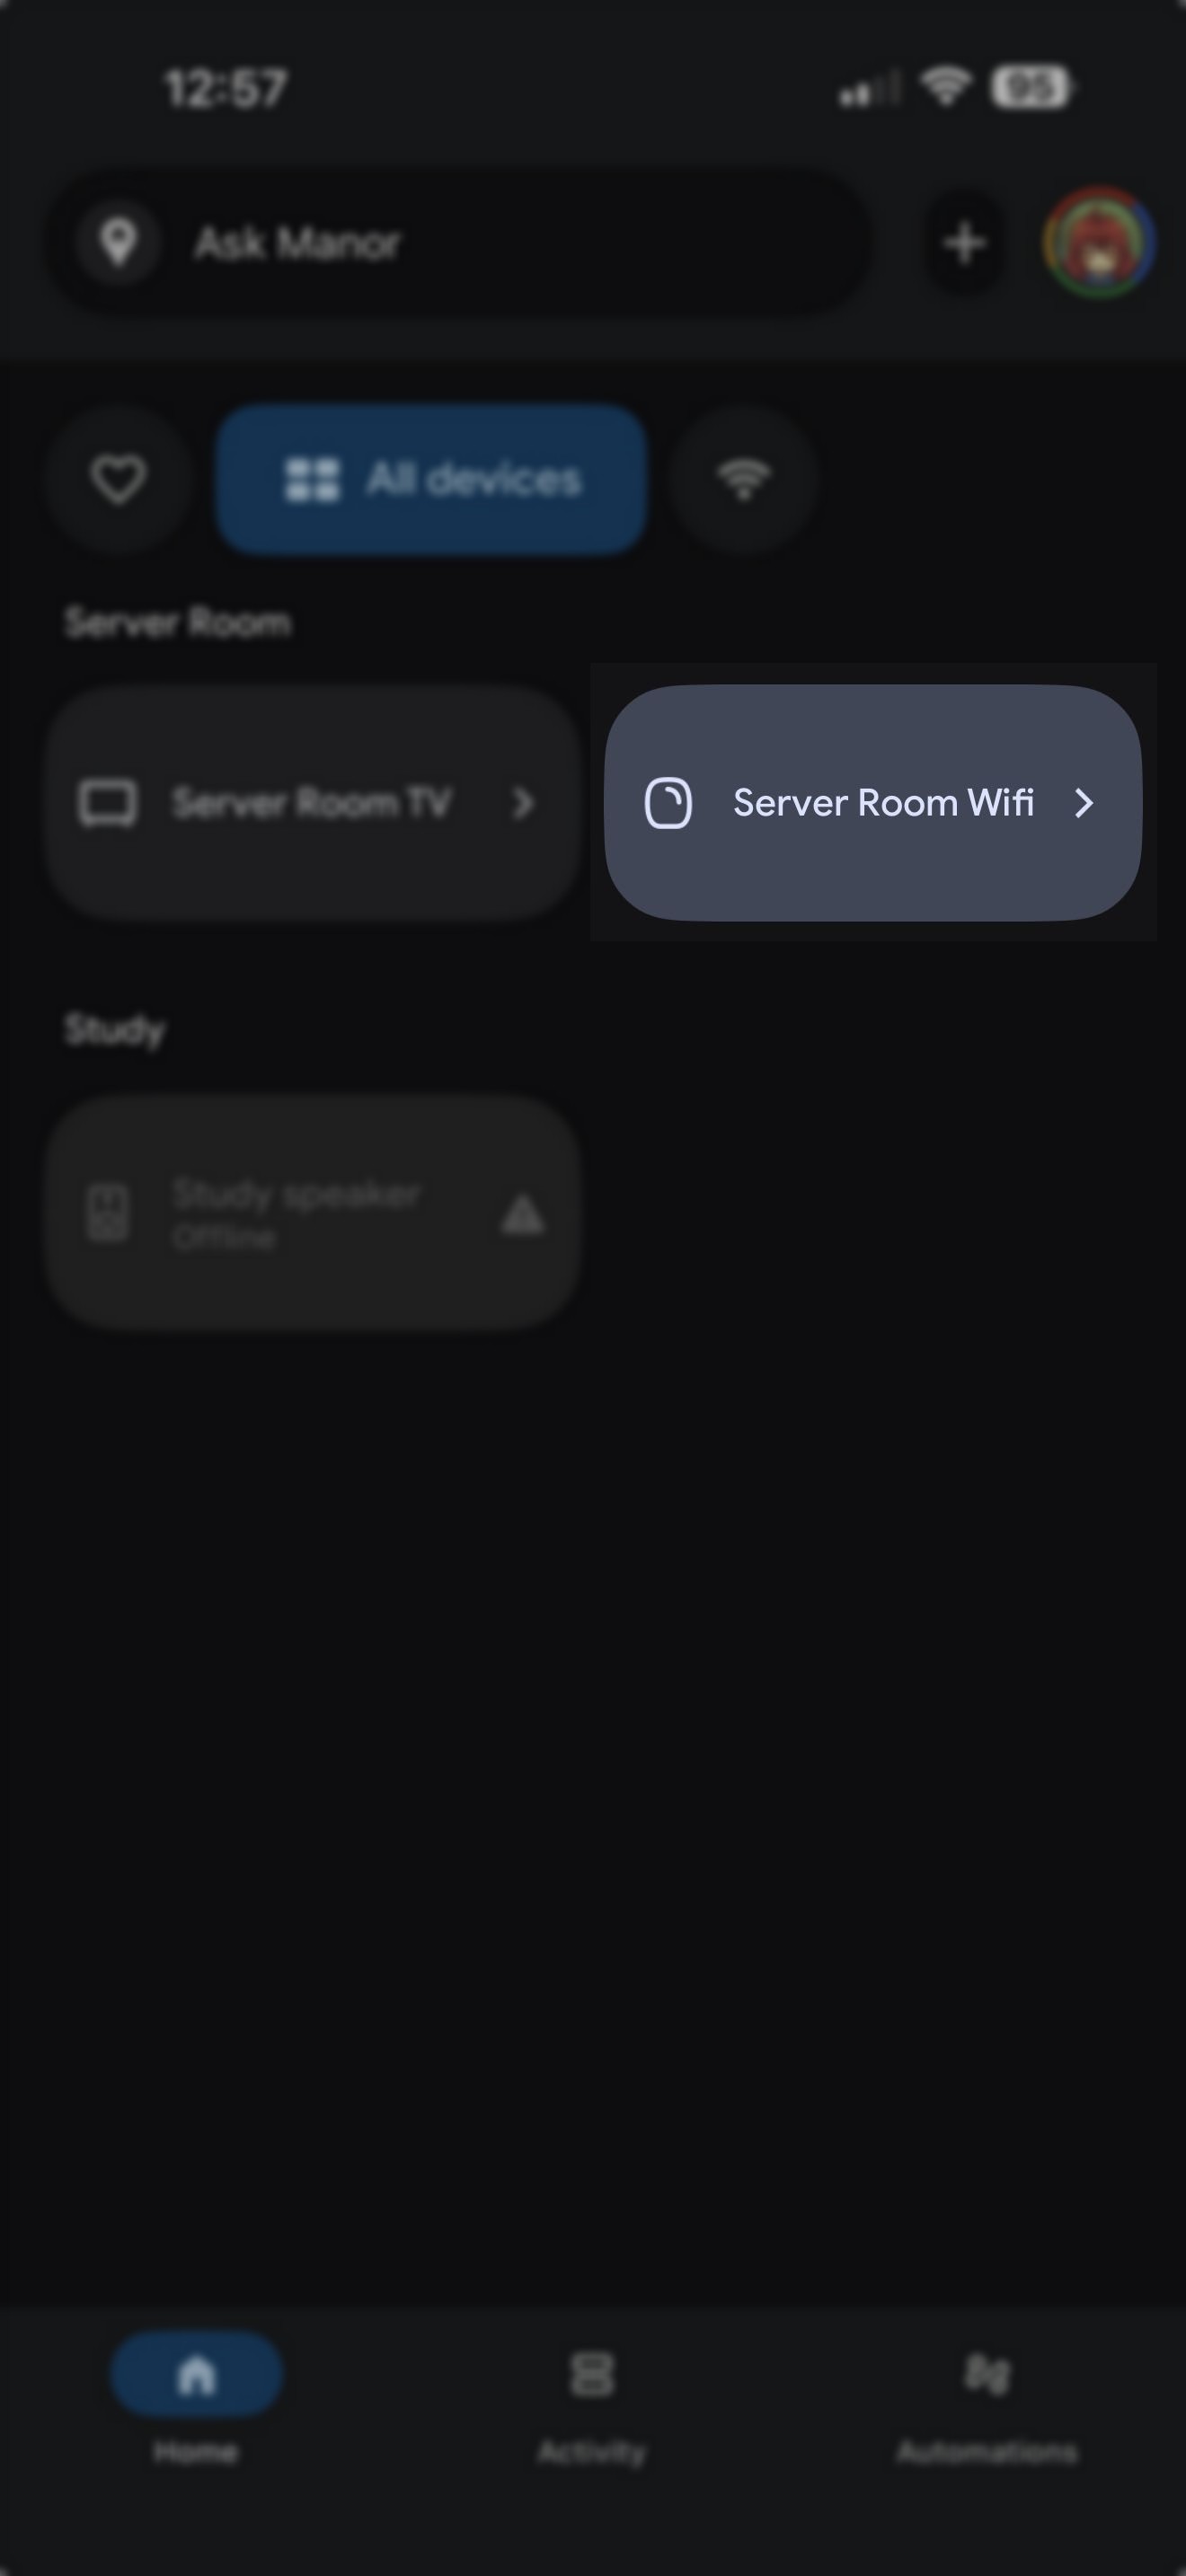
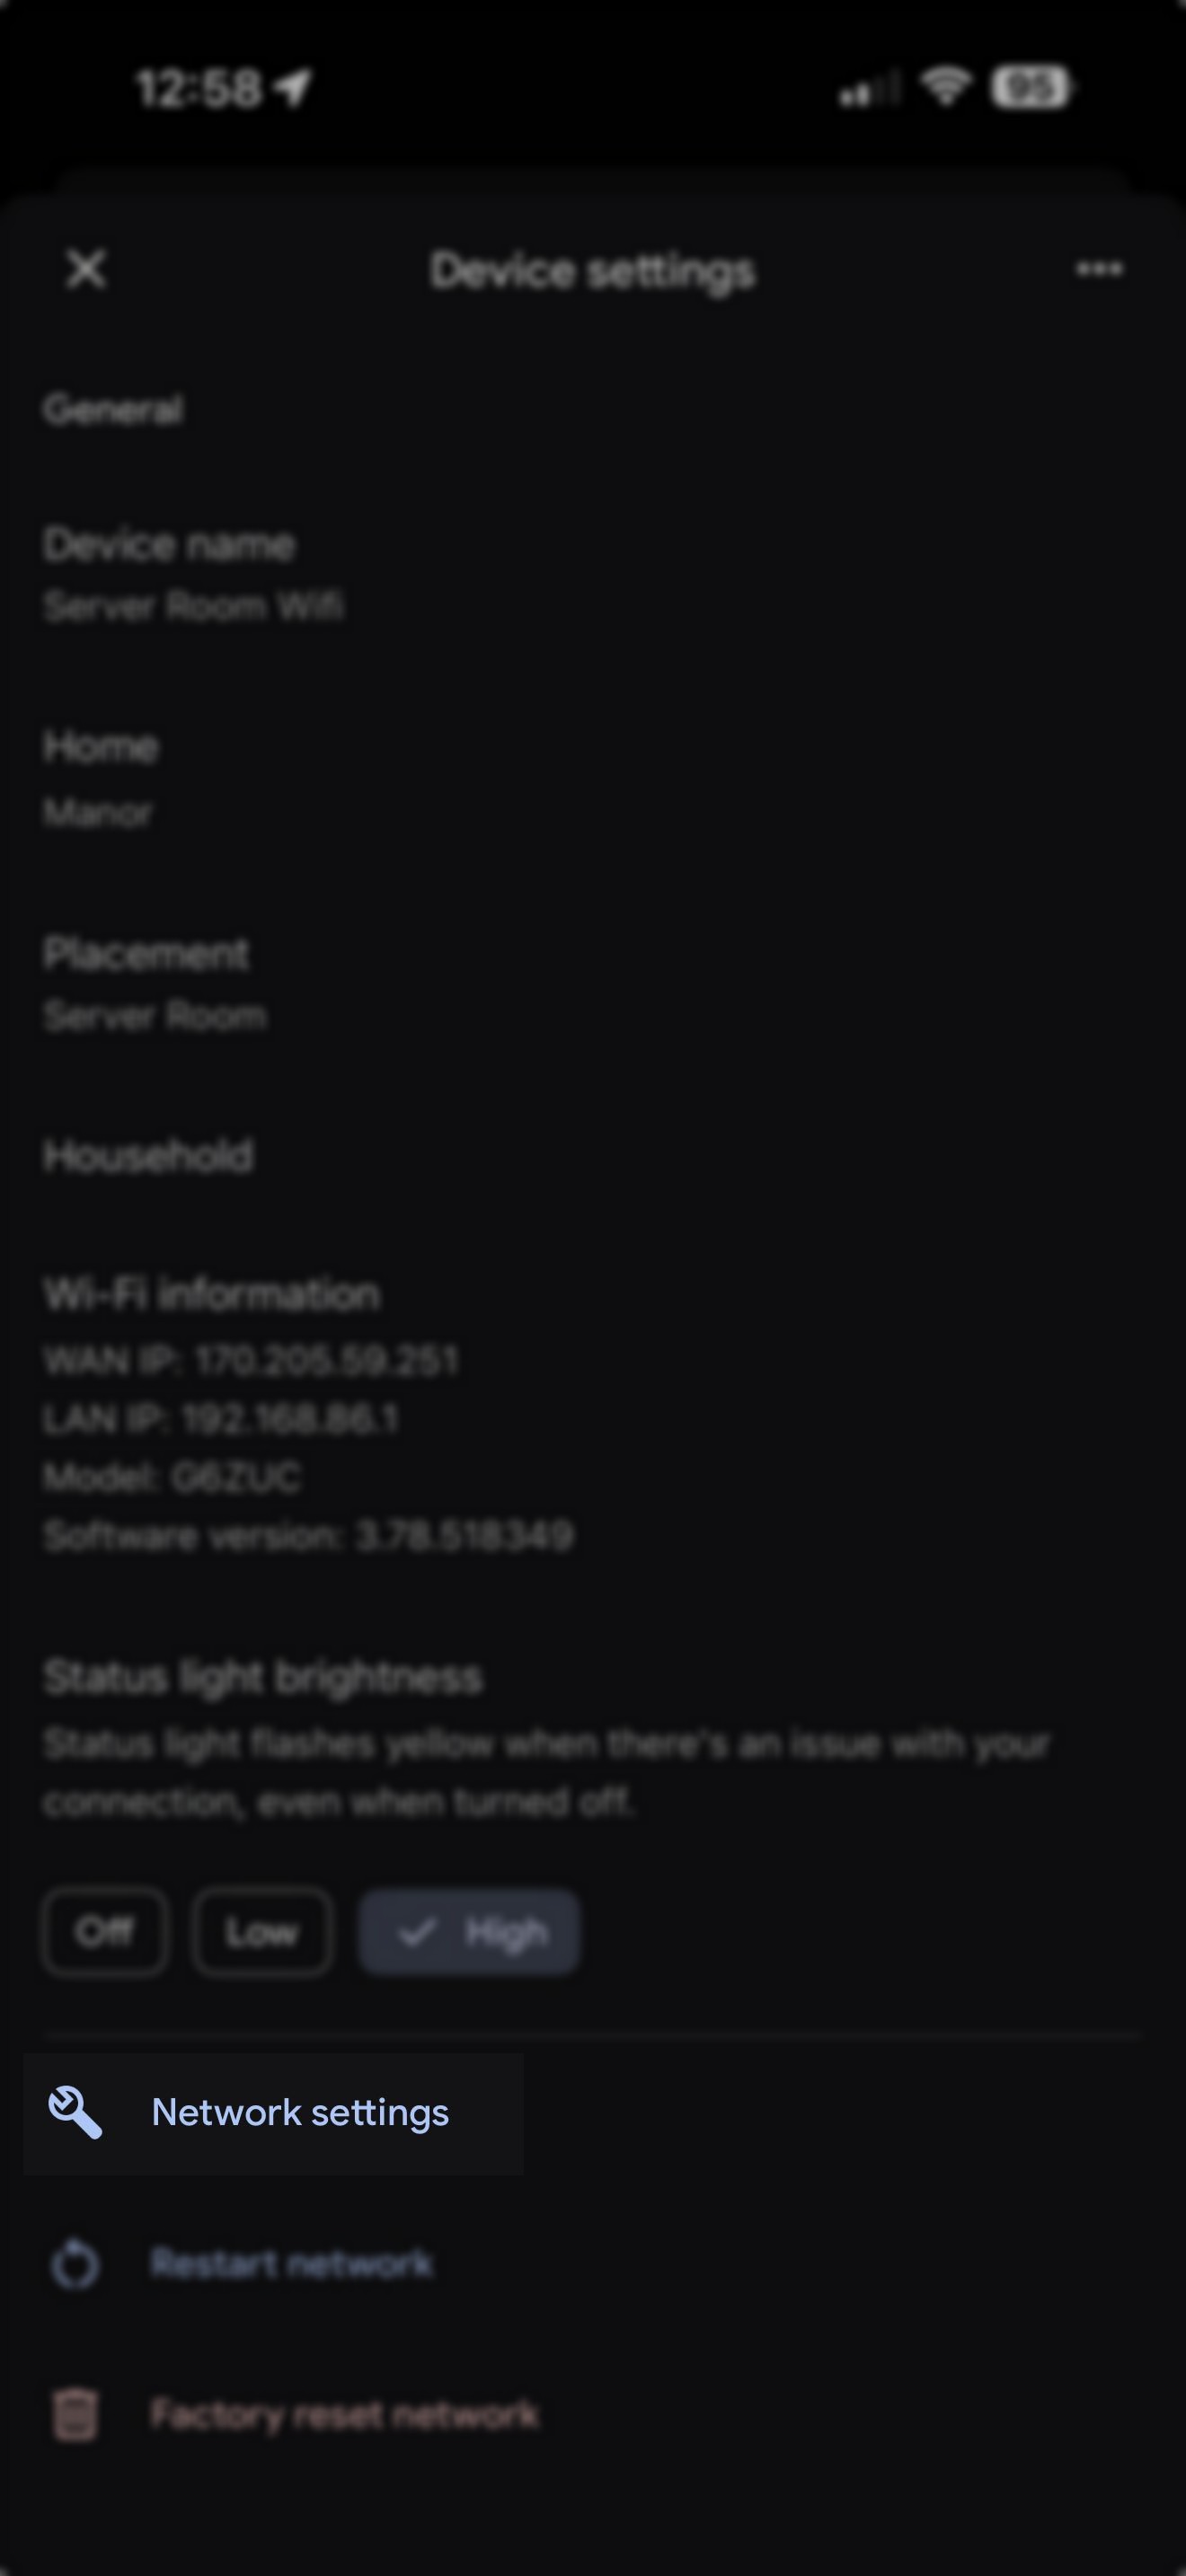
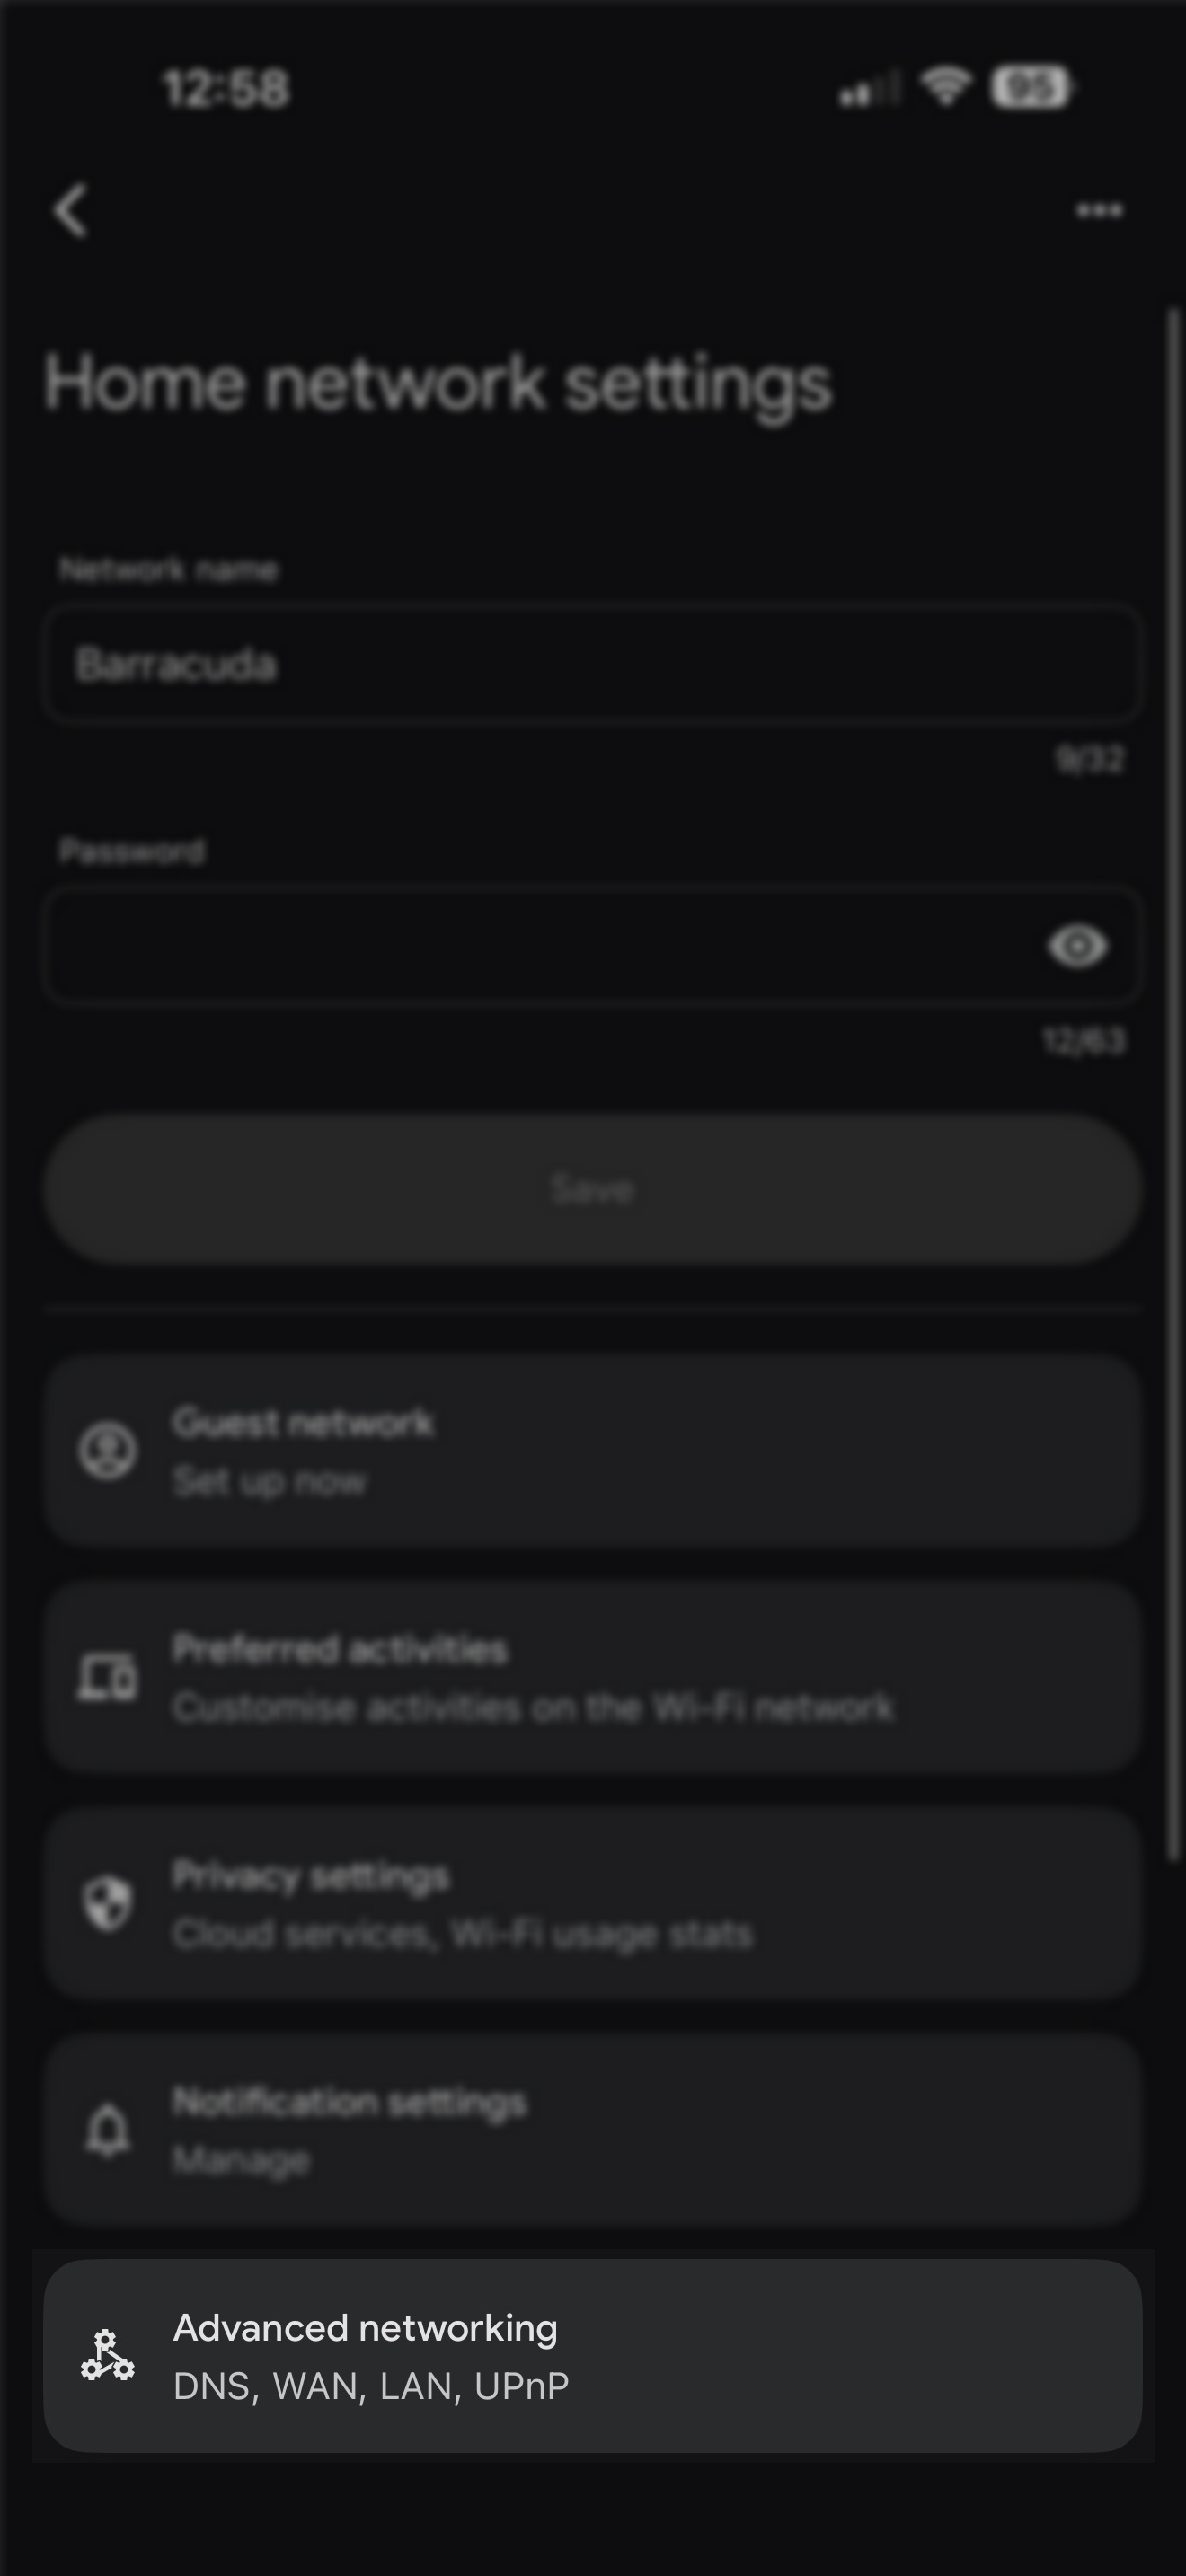
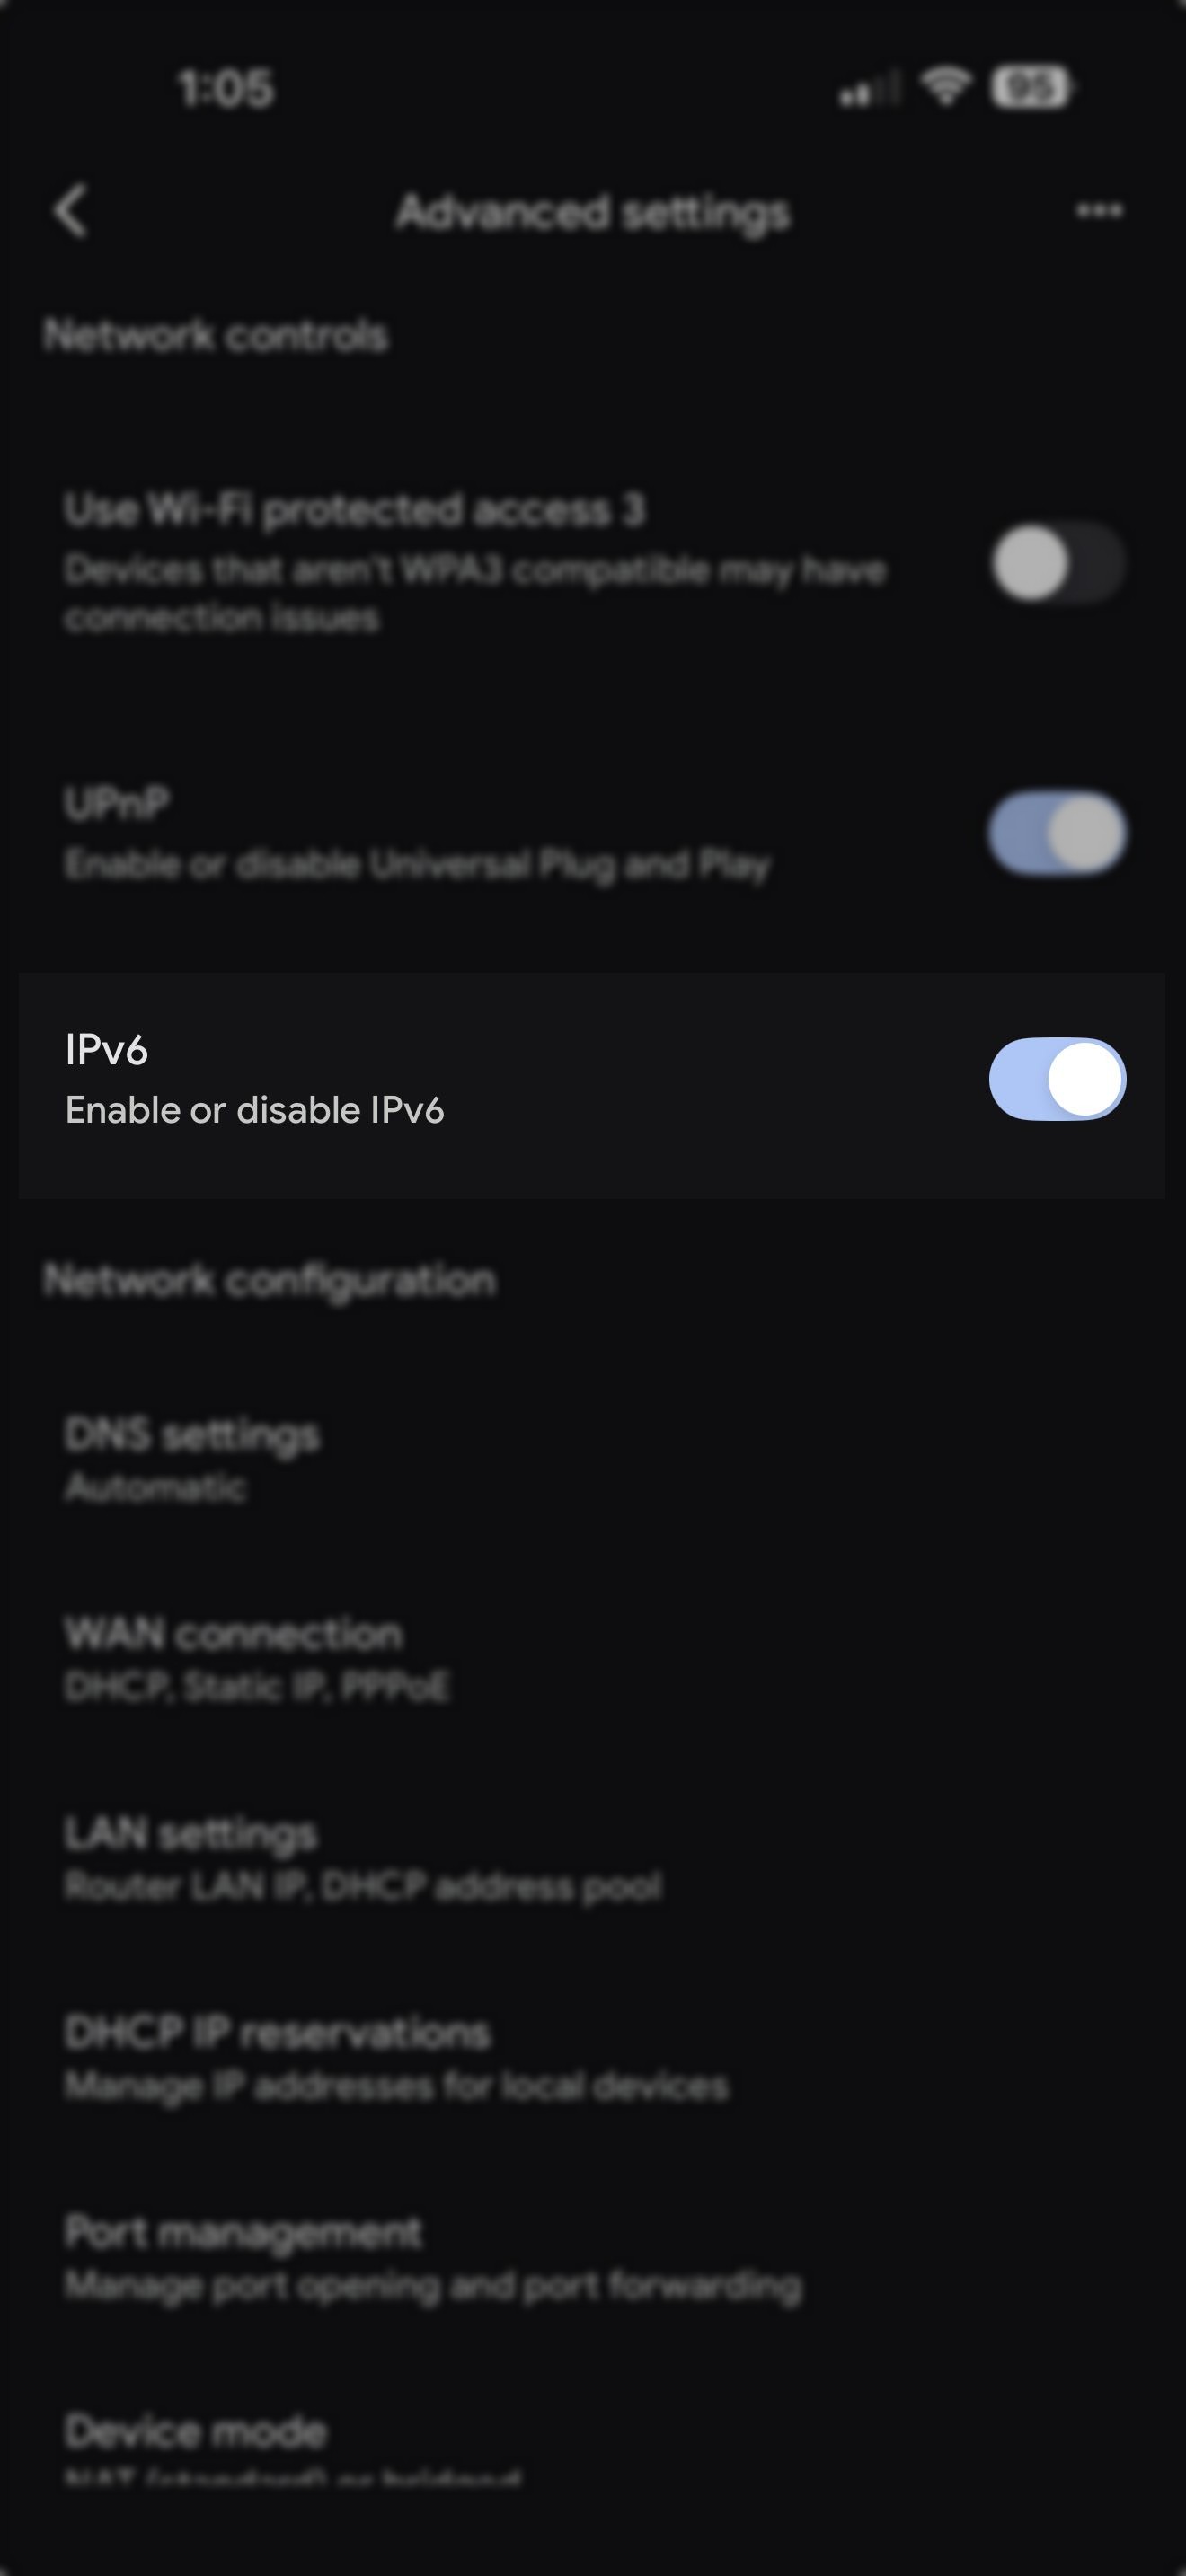
By default, Google Nest devices do not have IPv6 enabled. Using the Google Home app (App Store, Play Store), enable by going to:
Settings > Network settings > IPv6 > Slider is enabled.
 |  | |
 |  | |
 |
Source: Launtel
From command line:
/ipv6 address
add from-pool=launtel interface=bridge
/ipv6 dhcp-client
add add-default-route=yes interface=ether1 pool-name=launtel request=prefix
/ipv6 firewall filter
add action=accept chain=input comment="Allow all ICMP6" protocol=icmpv6
add action=accept chain=input comment="Allow DHCP for PD" dst-port=546 protocol=udp
add action=drop chain=input comment="Drop (invalid)" connection-state=invalid
add action=accept chain=input comment="Accept (established, related)" connection-state=established,related
add action=drop chain=input comment="Drop the rest" in-interface=ether1
add action=accept chain=forward comment="Allow all ICMP6" protocol=icmpv6
add action=drop chain=forward comment="Drop (invalid)" connection-state=invalid
add action=accept chain=forward comment="Accept (established, related)" connection-state=established,related
add action=drop chain=forward comment="Drop the rest" in-interface=ether1
/ipv6 nd
set [ find default=yes ] interface=bridge ra-interval=5s-10s
Source: Launtel
For the Web or Winbox GUI
## Go to IPV6 settings --> DHCP Client
  Interface = "ether1"
  Request = (Tick the prefix box)
  ## Give the pool a name
  Pool Name = Launtel
  Add Default Route = (Untick the box)

## Go to IPV6 --> Addresses ## (Important to have set the DHCP first or there will be no pools
## to select from when adding IP addresses)
## There is going to need to be 2 addresses set one for ether1 and one for bridge
## add an address for ether1 interface
  From Pool = Launtel
  Interface = ether1
  EUI64 = (Tick the box)
  Advertise = (Tick the box)
  With these setting as set hit the "O.K." button

## Add the second Address  this time for "bridge"
## Go to IPV6 --> Addresses ##
## add an address for ether1 interface
  From Pool = Launtel
  EUI64 = (Tick the box)
  Advertise = (Tick the box)
With these setting as set hit the "O.K." button

### Check the settings for "IPv6 Settings --> Settings"
  IPv6 Forward = (Tick the box)
  Accept Redirects = yes
  Accept Router Advertisements = yes
  Max Neighbor Entries = 2048

### Reboot Router after settings are set --  reset the network on connecting PC
Source: Launtel
You can manually set up an IPv6 Internet connection if your router does not detect it automatically.
To set up an IPv6 Internet connection on your NETGEAR router:
Launch a web browser from a device that is connected to your router's network.
Enter www.routerlogin.net. A login window displays.
Enter your user name and password.
The default user name is admin. The password is the one that you specified the first time that you logged in. The user name and password are case-sensitive.
The BASIC Home page displays.
Select ADVANCED > Advanced Setup > IPv6.
From the Internet Connection Type drop-down, select Auto Detect or Auto Config
Click or tap Apply.
Source: Netgear Knowledge Base
The configuration of OpenWrt is considerably more complex than consumer routers, as it requires the configuration of both the WAN6 interface, and the LAN interface.
We will go over how to set OpenWrt up in relay mode, which will assign a globally addressable IPv6 address to your LAN clients. If you also want a ULA (Unique Local Address), you will need to set the LAN interface up using server mode instead.
Configuring the wan6 interface
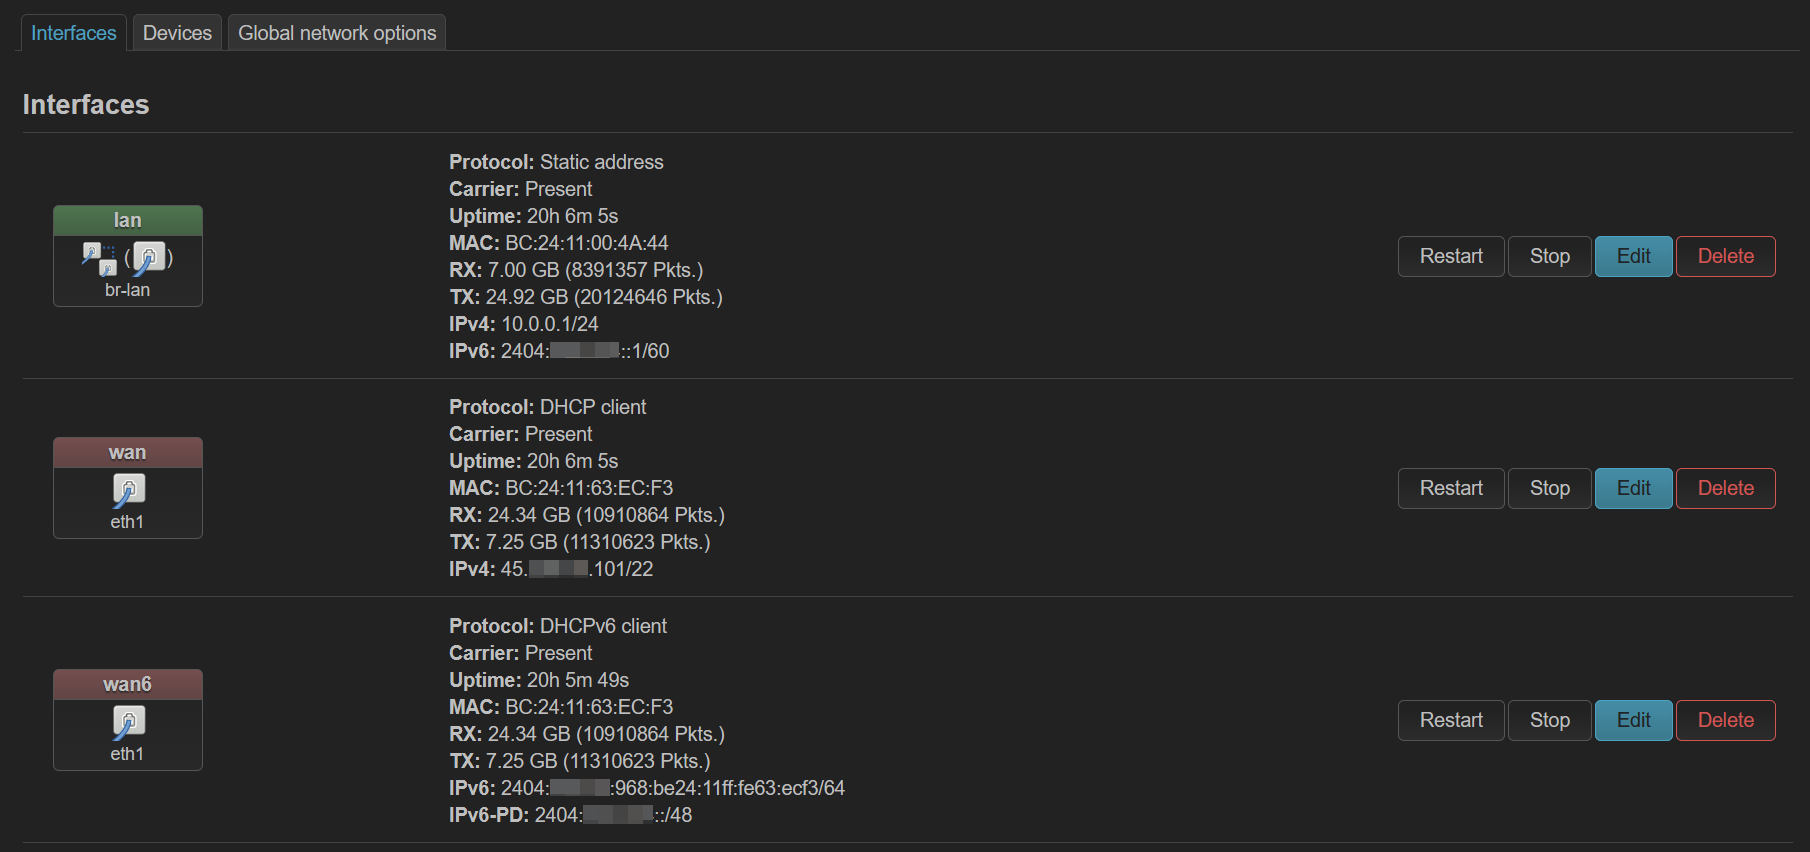
First, head to Network » Interfaces from the top navigation bar. You'll need to ensure you have an interface called wan6 — select add new interface from the Interfaces page if you only see a regular wan interface.
Interfaces » wan6 » General Settings | |
Protocol | DHCPv6 client |
Device | Ethernet Adapter that has wan in brackets |
Bring up on boot | Ticked |
Request IPv6-address | try |
Request IPv6-prefix | Automatic |
| |
Use default gateway | Ticked |
Use DNS servers advertised by peer | Ticked |
| |
Create / Assign firewall-zone | Assign to existing wan option |
| |
Set up DHCP Server | Click this button if presented with the option |
Ignore interface | Ticked |
Designated master | Unticked |
RA-Service | relay mode |
DHCPv6-Service | relay mode |
NDP-Proxy | disabled |
Configuring the LAN interface
Interfaces » lan » DHCP Server » IPv6 settings | |
Designated master | Unticked |
RA-Service | relay mode |
DHCPv6-Service | relay mode |
NDP-Proxy | disabled |
Click Save to exit the Interfaces » lan window, and then Save & Apply at the bottom right of the list of Interfaces. Consider rebooting the router.
Once configured, it should look similar to the picture below (running 25.12). Note the IPv6 under lan, and IPv6/IPv6-PD under wan6.
 Source: Launtel
WAN Config
 LAN config
 Source: Darryn Crook
-
Needs configuring through the command line. The important thing is to turn off "rapid commit". Thus:-
configure
set interfaces ethernet eth0 dhcpv6-pd rapid-commit disable
commit;save;exit
release dhcpv6-pd interface eth0
delete dhcpv6-pd duid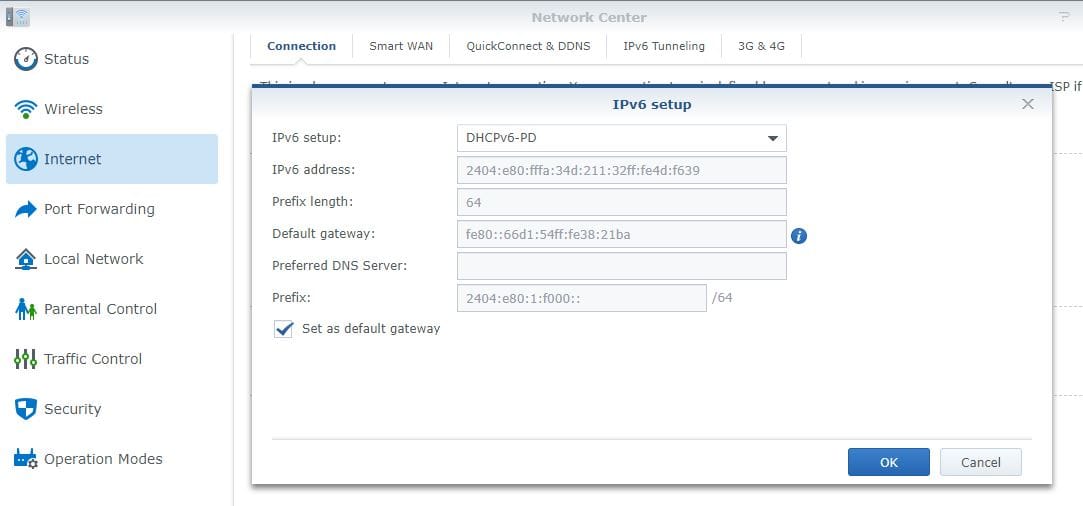
renew dhcpv6-pd interface eth0The IPv6 setup of a UniFi router requires configuration of both the WAN interface, and the LAN interface. UniFi hardware is an exception as we need to configure using SLAAC, not DHCPv6.
Configuring the WAN interface
Settings » Internet » IPv6 Configuration | |
Advanced | Manual |
Connection | SLAAC, Prefix Delegation |
Prefix Delegation Size | Auto, or 48 |
Auto DNS Server | Ticked |
 UniFi OS 5.1 Intenet Configuration UniFi OS 5.1 Intenet Configuration | .png) UniFi OS 4.3 Intenet Configuration UniFi OS 4.3 Intenet Configuration |
Configuring the LAN interface
Settings » Networks » Default (or your first listed option) | |
Protocol | IPv6 |
Interface Type | Prefix Delegation |
Prefix Delegation Interface | Primary (WAN1) |
Prefix Delegation ID | Auto |
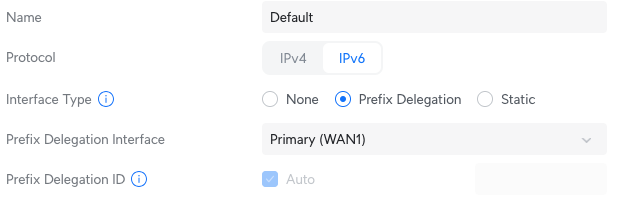 Click Apply Changes on the bottom right.
Testing IPv6
Once you've enabled IPv6 on your modem/router and restarted your devices, you'll want to check to confirm it's all working. Visit this website on any of your devices: http://isp.test-ipv6.com/
If you're having issues, you can provide us with these results and we'll be happy to troubleshoot the issue with you!
Contact us
Need help getting IPv6 set up, or have instructions you want to add? Let our Residential team know!